Slayer task/Bloodveld
| Bloodveld | |||||||||||||||||||||||||||||
|---|---|---|---|---|---|---|---|---|---|---|---|---|---|---|---|---|---|---|---|---|---|---|---|---|---|---|---|---|---|
| Requirements | |||||||||||||||||||||||||||||
| Skills | |||||||||||||||||||||||||||||
| Combat level | |||||||||||||||||||||||||||||
| Other | Priest in Peril | ||||||||||||||||||||||||||||
| Task amounts | |||||||||||||||||||||||||||||
| 70-110 (200-250) | |||||||||||||||||||||||||||||
| 40-90 (200-250) | |||||||||||||||||||||||||||||
| 70-130 (200-250) | |||||||||||||||||||||||||||||
| 120-170 (200-250) | |||||||||||||||||||||||||||||
| 120-185 (200-250) | |||||||||||||||||||||||||||||
| 130-200 (200-250) | |||||||||||||||||||||||||||||
| Advanced data | |||||||||||||||||||||||||||||
| Icon ID | 4141 | ||||||||||||||||||||||||||||
Bloodveld are a type of demon that use their long tongues to attack their victims. Being a Slayer monster, Bloodveld require a Slayer level of 50 to be damaged by players. As a demon, it is affected by demonbane weapons. Bloodvelds are popular among many players for their high Hitpoints and low Defence, thus making them good sources of experience.
Bloodveld are one of few monsters that attack with magic-based melee, meaning that despite it using melee attacks against the player, it is the player's magic defence (rather than their melee defence) that is used to determine the accuracy of the Bloodveld's attack. As such, it is recommended for players killing Bloodveld to equip armour with decent magic defence, such as dragonhide, as they are relatively accurate in combat. Players using Prayer should still pray melee instead of magic to nullify damage.
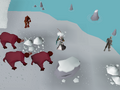
There are many locations to kill bloodvelds, though the most common one is the Stronghold Slayer Cave, due to its close proximity to a bank. The bloodvelds can also be killed here with a dwarf multicannon, requiring relatively low attention. The Meiyerditch Laboratories are notably multi-combat and cannonable. It is not recommended to kill bloodvelds elsewhere, as they take longer to access and/or are not cannonable. Bloodvelds have a superior variant, the Insatiable Bloodveld, if the perk Bigger and Badder is active.
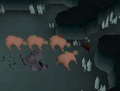
Players can also kill Mutated Bloodvelds in place of normal bloodvelds. These bloodvelds have even more hitpoints than their non-mutated counterparts and a vastly improved drop table to make up for their difficulty. Mutated bloodvelds are primarily found in the Catacombs of Kourend, though players who have made partial progress in Sins of the Father can access a second location in the Meiyerditch Laboratories. Both of these locations are multi-way areas, though the laboratories allow for the use of a cannon, thus requiring less attention than in the Catacombs of Kourend. A third location is offered in the Iorwerth Dungeon, requiring completion of Song of the Elves. This location is a single-way zone, but bloodvelds here can occasionally drop crystal shards and can also be cannoned.
If assigned by Konar quo Maten, it is reasonable to kill bloodvelds if sent to the Slayer Tower, but tasks sending the player to the God Wars Dungeon should be skipped, as they do not allow for the Insatiable Bloodveld to spawn, despite the dungeon being a multicombat area.
It is not recommended to kill them if assigned by Krystilia, as the only location they can be found is the Wilderness God Wars Dungeon, which is a dangerous multiway area where players run the risk of being killed by other players (along with incredibly sparse spawns) forcing them to bring minimal risk and thus lowering overall rates.
Players who are not assigned bloodveld by Konar can alternatively use Expert Reanimation on ensouled bloodveld heads, as reanimated bloodveld count towards the task. While overall slayer and combat experience is much less, this is a viable alternative for players who are training Prayer.
-
 Safespot found in the basement of the Slayer Tower.
 -
![Safespot found on the 1st floor[UK]2nd floor[US] floor of the Slayer Tower.](/img_auth.php/thumb/Bloodveld_%28Slayer_Tower_first_floor%29_safespot.png/120px-Bloodveld_%28Slayer_Tower_first_floor%29_safespot.png) Safespot found on the 1st floor[UK]2nd floor[US] floor of the Slayer Tower.
Safespot found on the 1st floor[UK]2nd floor[US] floor of the Slayer Tower. -
 Safespot between the rocks on the coast of the God Wars Dungeon
 -
 Cannonable Safespot found in the Iorwerth Dungeon.
_safespot.png)
![Safespot found on the 1st floor[UK]2nd floor[US] floor of the Slayer Tower.](/index.php?title=File:Bloodveld_(Slayer_Tower_first_floor)_safespot.png)
_safespot.png)

Slayer unlocks
| Unlock | Points cost | Notes | |
|---|---|---|---|
| Bigger and Badder | 150 | Increase the risk against certain slayer monsters with the chance of a superior version spawning whilst on a slayer task. | |
| Bleed me dry | 75 | Number of Bloodveld assigned is increased to 200-250. | |
Monster variants
| Monster | Combat level | Slayer XP | Locations | Notes |
|---|---|---|---|---|
| Bloodveld | 76 | 120 |
|
|
| Bloodveld | 81 | 134 |
| |
| Insatiable Bloodveld | 202 | 2,900 |
|
|
| Mutated Bloodveld | 123 | 170 |
| |
| Insatiable mutated Bloodveld | 278 | 4,100 |
| |
| Reanimated Bloodveld | N/A | 35 |
|
|
Location comparison
| Location | Map | Amount | Multicombat | Cannonable | Safespottable | Notes |
|---|---|---|---|---|---|---|
| Catacombs of Kourend | <maplink group="pins" align="center" text="Maplink" plane="0" y="10050" x="1659" zoom="2" mapID="32">
{"features":[{"type":"Feature","geometry":{"coordinates":[1625.5,10033.5],"type":"Point"},"properties":{"mapID":"32","providerID":0,"group":"pins","description":" X/Y: 1625,10033 ","plane":0,"icon":"redPin"}},{"type":"Feature","geometry":{"coordinates":[1628.5,10030.5],"type":"Point"},"properties":{"mapID":"32","providerID":0,"group":"pins","description":"X/Y: 1628,10030 ","plane":0,"icon":"redPin"}},{"type":"Feature","geometry":{"coordinates":[1629.5,10035.5],"type":"Point"},"properties":{"mapID":"32","providerID":0,"group":"pins","description":"X/Y: 1629,10035 ","plane":0,"icon":"redPin"}},{"type":"Feature","geometry":{"coordinates":[1631.5,10032.5],"type":"Point"},"properties":{"mapID":"32","providerID":0,"group":"pins","description":"X/Y: 1631,10032 ","plane":0,"icon":"redPin"}},{"type":"Feature","geometry":{"coordinates":[1633.5,10028.5],"type":"Point"},"properties":{"mapID":"32","providerID":0,"group":"pins","description":"X/Y: 1633,10028 ","plane":0,"icon":"redPin"}},{"type":"Feature","geometry":{"coordinates":[1634.5,10031.5],"type":"Point"},"properties":{"mapID":"32","providerID":0,"group":"pins","description":"X/Y: 1634,10031 ","plane":0,"icon":"redPin"}},{"type":"Feature","geometry":{"coordinates":[1672.5,10071.5],"type":"Point"},"properties":{"mapID":"32","providerID":0,"group":"pins","description":"X/Y: 1672,10071 ","plane":0,"icon":"redPin"}},{"type":"Feature","geometry":{"coordinates":[1675.5,10071.5],"type":"Point"},"properties":{"mapID":"32","providerID":0,"group":"pins","description":"X/Y: 1675,10071 ","plane":0,"icon":"redPin"}},{"type":"Feature","geometry":{"coordinates":[1675.5,10075.5],"type":"Point"},"properties":{"mapID":"32","providerID":0,"group":"pins","description":"X/Y: 1675,10075 ","plane":0,"icon":"redPin"}},{"type":"Feature","geometry":{"coordinates":[1678.5,10073.5],"type":"Point"},"properties":{"mapID":"32","providerID":0,"group":"pins","description":"X/Y: 1678,10073 ","plane":0,"icon":"redPin"}},{"type":"Feature","geometry":{"coordinates":[1678.5,10077.5],"type":"Point"},"properties":{"mapID":"32","providerID":0,"group":"pins","description":"X/Y: 1678,10077 ","plane":0,"icon":"redPin"}},{"type":"Feature","geometry":{"coordinates":[1681.5,10076.5],"type":"Point"},"properties":{"mapID":"32","providerID":0,"group":"pins","description":"X/Y: 1681,10076 ","plane":0,"icon":"redPin"}},{"type":"Feature","geometry":{"coordinates":[1685.5,10075.5],"type":"Point"},"properties":{"mapID":"32","providerID":0,"group":"pins","description":"X/Y: 1685,10075 ","plane":0,"icon":"redPin"}},{"type":"Feature","geometry":{"coordinates":[1688.5,10013.5],"type":"Point"},"properties":{"mapID":"32","providerID":0,"group":"pins","description":"X/Y: 1688,10013 ","plane":0,"icon":"redPin"}},{"type":"Feature","geometry":{"coordinates":[1688.5,10018.5],"type":"Point"},"properties":{"mapID":"32","providerID":0,"group":"pins","description":"X/Y: 1688,10018 ","plane":0,"icon":"redPin"}},{"type":"Feature","geometry":{"coordinates":[1691.5,10016.5],"type":"Point"},"properties":{"mapID":"32","providerID":0,"group":"pins","description":"X/Y: 1691,10016 ","plane":0,"icon":"redPin"}},{"type":"Feature","geometry":{"coordinates":[1694.5,10013.5],"type":"Point"},"properties":{"mapID":"32","providerID":0,"group":"pins","description":"X/Y: 1694,10013 ","plane":0,"icon":"redPin"}},{"type":"Feature","geometry":{"coordinates":[1694.5,10019.5],"type":"Point"},"properties":{"mapID":"32","providerID":0,"group":"pins","description":"X/Y: 1694,10019 ","plane":0,"icon":"redPin"}}],"type":"FeatureCollection"}</maplink> |
18 Mutated | Yes | No | Yes |
|
| Iorwerth Dungeon | <maplink group="pins" align="center" text="Maplink" plane="0" y="12430" x="3243" zoom="2" mapID="34">
{"features":[{"type":"Feature","geometry":{"coordinates":[3230.5,12434.5],"type":"Point"},"properties":{"mapID":"34","providerID":0,"group":"pins","description":" X/Y: 3230,12434 ","plane":0,"icon":"redPin"}},{"type":"Feature","geometry":{"coordinates":[3234.5,12435.5],"type":"Point"},"properties":{"mapID":"34","providerID":0,"group":"pins","description":"X/Y: 3234,12435 ","plane":0,"icon":"redPin"}},{"type":"Feature","geometry":{"coordinates":[3237.5,12443.5],"type":"Point"},"properties":{"mapID":"34","providerID":0,"group":"pins","description":"X/Y: 3237,12443 ","plane":0,"icon":"redPin"}},{"type":"Feature","geometry":{"coordinates":[3239.5,12433.5],"type":"Point"},"properties":{"mapID":"34","providerID":0,"group":"pins","description":"X/Y: 3239,12433 ","plane":0,"icon":"redPin"}},{"type":"Feature","geometry":{"coordinates":[3239.5,12438.5],"type":"Point"},"properties":{"mapID":"34","providerID":0,"group":"pins","description":"X/Y: 3239,12438 ","plane":0,"icon":"redPin"}},{"type":"Feature","geometry":{"coordinates":[3242.5,12441.5],"type":"Point"},"properties":{"mapID":"34","providerID":0,"group":"pins","description":"X/Y: 3242,12441 ","plane":0,"icon":"redPin"}},{"type":"Feature","geometry":{"coordinates":[3244.5,12418.5],"type":"Point"},"properties":{"mapID":"34","providerID":0,"group":"pins","description":"X/Y: 3244,12418 ","plane":0,"icon":"redPin"}},{"type":"Feature","geometry":{"coordinates":[3249.5,12414.5],"type":"Point"},"properties":{"mapID":"34","providerID":0,"group":"pins","description":"X/Y: 3249,12414 ","plane":0,"icon":"redPin"}},{"type":"Feature","geometry":{"coordinates":[3249.5,12421.5],"type":"Point"},"properties":{"mapID":"34","providerID":0,"group":"pins","description":"X/Y: 3249,12421 ","plane":0,"icon":"redPin"}},{"type":"Feature","geometry":{"coordinates":[3251.5,12418.5],"type":"Point"},"properties":{"mapID":"34","providerID":0,"group":"pins","description":"X/Y: 3251,12418 ","plane":0,"icon":"redPin"}},{"type":"Feature","geometry":{"coordinates":[3255.5,12422.5],"type":"Point"},"properties":{"mapID":"34","providerID":0,"group":"pins","description":"X/Y: 3255,12422 ","plane":0,"icon":"redPin"}},{"type":"Feature","geometry":{"coordinates":[3256.5,12416.5],"type":"Point"},"properties":{"mapID":"34","providerID":0,"group":"pins","description":"X/Y: 3256,12416 ","plane":0,"icon":"redPin"}}],"type":"FeatureCollection"}</maplink> |
12 Mutated | No | Yes | Yes |
|
| God Wars Dungeon | <maplink mapID="7" align="center" text="Maplink" plane="0" y="5327" x="2890" group="pins" zoom="2">
{"features":[{"type":"Feature","geometry":{"coordinates":[2880.5,5321.5],"type":"Point"},"properties":{"mapID":"7","providerID":0,"group":"pins","description":" X/Y: 2880,5321 ","plane":0,"icon":"greenPin"}},{"type":"Feature","geometry":{"coordinates":[2883.5,5349.5],"type":"Point"},"properties":{"mapID":"7","providerID":0,"group":"pins","description":"X/Y: 2883,5349 ","plane":0,"icon":"greenPin"}},{"type":"Feature","geometry":{"coordinates":[2884.5,5325.5],"type":"Point"},"properties":{"mapID":"7","providerID":0,"group":"pins","description":"X/Y: 2884,5325 ","plane":0,"icon":"greenPin"}},{"type":"Feature","geometry":{"coordinates":[2885.5,5315.5],"type":"Point"},"properties":{"mapID":"7","providerID":0,"group":"pins","description":"X/Y: 2885,5315 ","plane":0,"icon":"greenPin"}},{"type":"Feature","geometry":{"coordinates":[2886.5,5323.5],"type":"Point"},"properties":{"mapID":"7","providerID":0,"group":"pins","description":"X/Y: 2886,5323 ","plane":0,"icon":"greenPin"}},{"type":"Feature","geometry":{"coordinates":[2886.5,5359.5],"type":"Point"},"properties":{"mapID":"7","providerID":0,"group":"pins","description":"X/Y: 2886,5359 ","plane":0,"icon":"greenPin"}},{"type":"Feature","geometry":{"coordinates":[2889.5,5322.5],"type":"Point"},"properties":{"mapID":"7","providerID":0,"group":"pins","description":"X/Y: 2889,5322 ","plane":0,"icon":"greenPin"}},{"type":"Feature","geometry":{"coordinates":[2894.5,5350.5],"type":"Point"},"properties":{"mapID":"7","providerID":0,"group":"pins","description":"X/Y: 2894,5350 ","plane":0,"icon":"greenPin"}},{"type":"Feature","geometry":{"coordinates":[2894.5,5362.5],"type":"Point"},"properties":{"mapID":"7","providerID":0,"group":"pins","description":"X/Y: 2894,5362 ","plane":0,"icon":"greenPin"}},{"type":"Feature","geometry":{"coordinates":[2922.5,5358.5],"type":"Point"},"properties":{"mapID":"7","providerID":0,"group":"pins","description":"X/Y: 2922,5358 ","plane":0,"icon":"greenPin"}},{"type":"Feature","geometry":{"coordinates":[2928.5,5356.5],"type":"Point"},"properties":{"mapID":"7","providerID":0,"group":"pins","description":"X/Y: 2928,5356 ","plane":0,"icon":"greenPin"}},{"type":"Feature","geometry":{"coordinates":[2935.5,5353.5],"type":"Point"},"properties":{"mapID":"7","providerID":0,"group":"pins","description":"X/Y: 2935,5353 ","plane":0,"icon":"greenPin"}},{"type":"Feature","geometry":{"coordinates":[2845.5,5283.5],"type":"Point"},"properties":{"mapID":"7","providerID":0,"group":"pins","description":"X/Y: 2845,5283 ","plane":0,"icon":"greenPin"}},{"type":"Feature","geometry":{"coordinates":[2873.5,5299.5],"type":"Point"},"properties":{"mapID":"7","providerID":0,"group":"pins","description":"X/Y: 2873,5299 ","plane":0,"icon":"greenPin"}},{"type":"Feature","geometry":{"coordinates":[2854.5,5355.5],"type":"Point"},"properties":{"mapID":"7","providerID":0,"group":"pins","description":"X/Y: 2854,5355 ","plane":0,"icon":"greenPin"}},{"type":"Feature","geometry":{"coordinates":[2862.5,5336.5],"type":"Point"},"properties":{"mapID":"7","providerID":0,"group":"pins","description":"X/Y: 2862,5336 ","plane":0,"icon":"greenPin"}}],"type":"FeatureCollection"}</maplink> |
16 Bloodveld | Yes | No | Yes |
|
| Meiyerditch Laboratories | <maplink mapID="10106" align="center" text="Maplink" plane="0" y="9744" x="3582" group="pins" zoom="2">
{"features":[{"type":"Feature","geometry":{"coordinates":[3564.5,9741.5],"type":"Point"},"properties":{"mapID":"10106","providerID":0,"description":" X/Y: 3564,9741 ","group":"pins","icon":"greenPin","plane":0,"title":"Bloodveld"}},{"type":"Feature","geometry":{"coordinates":[3566.5,9735.5],"type":"Point"},"properties":{"mapID":"10106","providerID":0,"description":"X/Y: 3566,9735 ","group":"pins","icon":"greenPin","plane":0,"title":"Bloodveld"}},{"type":"Feature","geometry":{"coordinates":[3572.5,9741.5],"type":"Point"},"properties":{"mapID":"10106","providerID":0,"description":"X/Y: 3572,9741 ","group":"pins","icon":"greenPin","plane":0,"title":"Bloodveld"}},{"type":"Feature","geometry":{"coordinates":[3574.5,9737.5],"type":"Point"},"properties":{"mapID":"10106","providerID":0,"description":"X/Y: 3574,9737 ","group":"pins","icon":"greenPin","plane":0,"title":"Bloodveld"}},{"type":"Feature","geometry":{"coordinates":[3588.5,9736.5],"type":"Point"},"properties":{"mapID":"10106","providerID":0,"description":"X/Y: 3588,9736 ","group":"pins","icon":"redPin","plane":0,"title":"Mutated Bloodveld"}},{"type":"Feature","geometry":{"coordinates":[3592.5,9745.5],"type":"Point"},"properties":{"mapID":"10106","providerID":0,"description":"X/Y: 3592,9745 ","group":"pins","icon":"redPin","plane":0,"title":"Mutated Bloodveld"}},{"type":"Feature","geometry":{"coordinates":[3594.5,9742.5],"type":"Point"},"properties":{"mapID":"10106","providerID":0,"description":"X/Y: 3594,9742 ","group":"pins","icon":"redPin","plane":0,"title":"Mutated Bloodveld"}},{"type":"Feature","geometry":{"coordinates":[3596.5,9750.5],"type":"Point"},"properties":{"mapID":"10106","providerID":0,"description":"X/Y: 3596,9750 ","group":"pins","icon":"redPin","plane":0,"title":"Mutated Bloodveld"}},{"type":"Feature","geometry":{"coordinates":[3597.5,9735.5],"type":"Point"},"properties":{"mapID":"10106","providerID":0,"description":"X/Y: 3597,9735 ","group":"pins","icon":"redPin","plane":0,"title":"Mutated Bloodveld"}},{"type":"Feature","geometry":{"coordinates":[3599.5,9747.5],"type":"Point"},"properties":{"mapID":"10106","providerID":0,"description":"X/Y: 3599,9747 ","group":"pins","icon":"redPin","plane":0,"title":"Mutated Bloodveld"}},{"type":"Feature","geometry":{"coordinates":[3600.5,9739.5],"type":"Point"},"properties":{"mapID":"10106","providerID":0,"description":"X/Y: 3600,9739 ","group":"pins","icon":"redPin","plane":0,"title":"Mutated Bloodveld"}}],"type":"FeatureCollection"}</maplink> |
4 Bloodveld |
Yes | Yes | Yes |
|
| Slayer Tower (1st floor[UK]2nd floor[US]) | <maplink group="pins" align="center" text="Maplink" plane="1" y="3568" x="3417" zoom="2" mapID="0">
{"features":[{"type":"Feature","geometry":{"coordinates":[3409.5,3571.5],"type":"Point"},"properties":{"mapID":"0","providerID":0,"group":"pins","description":" X/Y: 3409,3571 ","plane":"1","icon":"greenPin"}},{"type":"Feature","geometry":{"coordinates":[3411.5,3567.5],"type":"Point"},"properties":{"mapID":"0","providerID":0,"group":"pins","description":"X/Y: 3411,3567 ","plane":"1","icon":"greenPin"}},{"type":"Feature","geometry":{"coordinates":[3411.5,3576.5],"type":"Point"},"properties":{"mapID":"0","providerID":0,"group":"pins","description":"X/Y: 3411,3576 ","plane":"1","icon":"greenPin"}},{"type":"Feature","geometry":{"coordinates":[3412.5,3560.5],"type":"Point"},"properties":{"mapID":"0","providerID":0,"group":"pins","description":"X/Y: 3412,3560 ","plane":"1","icon":"greenPin"}},{"type":"Feature","geometry":{"coordinates":[3416.5,3557.5],"type":"Point"},"properties":{"mapID":"0","providerID":0,"group":"pins","description":"X/Y: 3416,3557 ","plane":"1","icon":"greenPin"}},{"type":"Feature","geometry":{"coordinates":[3416.5,3561.5],"type":"Point"},"properties":{"mapID":"0","providerID":0,"group":"pins","description":"X/Y: 3416,3561 ","plane":"1","icon":"greenPin"}},{"type":"Feature","geometry":{"coordinates":[3416.5,3573.5],"type":"Point"},"properties":{"mapID":"0","providerID":0,"group":"pins","description":"X/Y: 3416,3573 ","plane":"1","icon":"greenPin"}},{"type":"Feature","geometry":{"coordinates":[3417.5,3565.5],"type":"Point"},"properties":{"mapID":"0","providerID":0,"group":"pins","description":"X/Y: 3417,3565 ","plane":"1","icon":"greenPin"}},{"type":"Feature","geometry":{"coordinates":[3419.5,3559.5],"type":"Point"},"properties":{"mapID":"0","providerID":0,"group":"pins","description":"X/Y: 3419,3559 ","plane":"1","icon":"greenPin"}},{"type":"Feature","geometry":{"coordinates":[3421.5,3574.5],"type":"Point"},"properties":{"mapID":"0","providerID":0,"group":"pins","description":"X/Y: 3421,3574 ","plane":"1","icon":"greenPin"}},{"type":"Feature","geometry":{"coordinates":[3422.5,3567.5],"type":"Point"},"properties":{"mapID":"0","providerID":0,"group":"pins","description":"X/Y: 3422,3567 ","plane":"1","icon":"greenPin"}},{"type":"Feature","geometry":{"coordinates":[3424.5,3560.5],"type":"Point"},"properties":{"mapID":"0","providerID":0,"group":"pins","description":"X/Y: 3424,3560 ","plane":"1","icon":"greenPin"}},{"type":"Feature","geometry":{"coordinates":[3424.5,3564.5],"type":"Point"},"properties":{"mapID":"0","providerID":0,"group":"pins","description":"X/Y: 3424,3564 ","plane":"1","icon":"greenPin"}},{"type":"Feature","geometry":{"coordinates":[3426.5,3557.5],"type":"Point"},"properties":{"mapID":"0","providerID":0,"group":"pins","description":"X/Y: 3426,3557 ","plane":"1","icon":"greenPin"}},{"type":"Feature","geometry":{"coordinates":[3426.5,3573.5],"type":"Point"},"properties":{"mapID":"0","providerID":0,"group":"pins","description":"X/Y: 3426,3573 ","plane":"1","icon":"greenPin"}}],"type":"FeatureCollection"}</maplink> |
15 Bloodveld | No | No | Yes | |
| Slayer Tower (basement) | <maplink group="pins" align="center" text="Maplink" plane="0" y="9941" x="3413" zoom="2" mapID="14">
{"features":[{"type":"Feature","geometry":{"coordinates":[3403.5,9934.5],"type":"Point"},"properties":{"mapID":"14","providerID":0,"group":"pins","description":" X/Y: 3403,9934 ","plane":0,"icon":"greenPin"}},{"type":"Feature","geometry":{"coordinates":[3404.5,9940.5],"type":"Point"},"properties":{"mapID":"14","providerID":0,"group":"pins","description":"X/Y: 3404,9940 ","plane":0,"icon":"greenPin"}},{"type":"Feature","geometry":{"coordinates":[3405.5,9929.5],"type":"Point"},"properties":{"mapID":"14","providerID":0,"group":"pins","description":"X/Y: 3405,9929 ","plane":0,"icon":"greenPin"}},{"type":"Feature","geometry":{"coordinates":[3406.5,9949.5],"type":"Point"},"properties":{"mapID":"14","providerID":0,"group":"pins","description":"X/Y: 3406,9949 ","plane":0,"icon":"greenPin"}},{"type":"Feature","geometry":{"coordinates":[3409.5,9939.5],"type":"Point"},"properties":{"mapID":"14","providerID":0,"group":"pins","description":"X/Y: 3409,9939 ","plane":0,"icon":"greenPin"}},{"type":"Feature","geometry":{"coordinates":[3411.5,9945.5],"type":"Point"},"properties":{"mapID":"14","providerID":0,"group":"pins","description":"X/Y: 3411,9945 ","plane":0,"icon":"greenPin"}},{"type":"Feature","geometry":{"coordinates":[3412.5,9935.5],"type":"Point"},"properties":{"mapID":"14","providerID":0,"group":"pins","description":"X/Y: 3412,9935 ","plane":0,"icon":"greenPin"}},{"type":"Feature","geometry":{"coordinates":[3416.5,9942.5],"type":"Point"},"properties":{"mapID":"14","providerID":0,"group":"pins","description":"X/Y: 3416,9942 ","plane":0,"icon":"greenPin"}},{"type":"Feature","geometry":{"coordinates":[3417.5,9931.5],"type":"Point"},"properties":{"mapID":"14","providerID":0,"group":"pins","description":"X/Y: 3417,9931 ","plane":0,"icon":"greenPin"}},{"type":"Feature","geometry":{"coordinates":[3417.5,9937.5],"type":"Point"},"properties":{"mapID":"14","providerID":0,"group":"pins","description":"X/Y: 3417,9937 ","plane":0,"icon":"greenPin"}},{"type":"Feature","geometry":{"coordinates":[3421.5,9939.5],"type":"Point"},"properties":{"mapID":"14","providerID":0,"group":"pins","description":"X/Y: 3421,9939 ","plane":0,"icon":"greenPin"}},{"type":"Feature","geometry":{"coordinates":[3423.5,9935.5],"type":"Point"},"properties":{"mapID":"14","providerID":0,"group":"pins","description":"X/Y: 3423,9935 ","plane":0,"icon":"greenPin"}}],"type":"FeatureCollection"}</maplink> |
12 Bloodveld | No | No | Yes |
|
| Stronghold Slayer Cave | <maplink mapID="19" align="center" text="Maplink" plane="0" y="9827" x="2461" group="pins" zoom="2">
{"features":[{"type":"Feature","geometry":{"coordinates":[2434.5,9817.5],"type":"Point"},"properties":{"mapID":"19","providerID":0,"group":"pins","description":" X/Y: 2434,9817 ","plane":0,"icon":"greenPin"}},{"type":"Feature","geometry":{"coordinates":[2434.5,9824.5],"type":"Point"},"properties":{"mapID":"19","providerID":0,"group":"pins","description":"X/Y: 2434,9824 ","plane":0,"icon":"greenPin"}},{"type":"Feature","geometry":{"coordinates":[2440.5,9821.5],"type":"Point"},"properties":{"mapID":"19","providerID":0,"group":"pins","description":"X/Y: 2440,9821 ","plane":0,"icon":"greenPin"}},{"type":"Feature","geometry":{"coordinates":[2447.5,9822.5],"type":"Point"},"properties":{"mapID":"19","providerID":0,"group":"pins","description":"X/Y: 2447,9822 ","plane":0,"icon":"greenPin"}},{"type":"Feature","geometry":{"coordinates":[2451.5,9817.5],"type":"Point"},"properties":{"mapID":"19","providerID":0,"group":"pins","description":"X/Y: 2451,9817 ","plane":0,"icon":"greenPin"}},{"type":"Feature","geometry":{"coordinates":[2453.5,9822.5],"type":"Point"},"properties":{"mapID":"19","providerID":0,"group":"pins","description":"X/Y: 2453,9822 ","plane":0,"icon":"greenPin"}},{"type":"Feature","geometry":{"coordinates":[2465.5,9830.5],"type":"Point"},"properties":{"mapID":"19","providerID":0,"group":"pins","description":"X/Y: 2465,9830 ","plane":0,"icon":"greenPin"}},{"type":"Feature","geometry":{"coordinates":[2470.5,9834.5],"type":"Point"},"properties":{"mapID":"19","providerID":0,"group":"pins","description":"X/Y: 2470,9834 ","plane":0,"icon":"greenPin"}},{"type":"Feature","geometry":{"coordinates":[2472.5,9830.5],"type":"Point"},"properties":{"mapID":"19","providerID":0,"group":"pins","description":"X/Y: 2472,9830 ","plane":0,"icon":"greenPin"}},{"type":"Feature","geometry":{"coordinates":[2485.5,9822.5],"type":"Point"},"properties":{"mapID":"19","providerID":0,"group":"pins","description":"X/Y: 2485,9822 ","plane":0,"icon":"greenPin"}},{"type":"Feature","geometry":{"coordinates":[2488.5,9827.5],"type":"Point"},"properties":{"mapID":"19","providerID":0,"group":"pins","description":"X/Y: 2488,9827 ","plane":0,"icon":"greenPin"}},{"type":"Feature","geometry":{"coordinates":[2489.5,9818.5],"type":"Point"},"properties":{"mapID":"19","providerID":0,"group":"pins","description":"X/Y: 2489,9818 ","plane":0,"icon":"greenPin"}}],"type":"FeatureCollection"}</maplink> |
12 Bloodveld | No | Yes | Yes |
|
| Wilderness God Wars Dungeon | <maplink group="pins" align="center" text="Maplink" plane="0" y="10095" x="2959" zoom="2" mapID="26">
{"features":[{"type":"Feature","geometry":{"coordinates":[2950.5,10085.5],"type":"Point"},"properties":{"mapID":"26","providerID":0,"group":"pins","description":" X/Y: 2950,10085 ","plane":0,"icon":"greenPin"}},{"type":"Feature","geometry":{"coordinates":[2952.5,10090.5],"type":"Point"},"properties":{"mapID":"26","providerID":0,"group":"pins","description":"X/Y: 2952,10090 ","plane":0,"icon":"greenPin"}},{"type":"Feature","geometry":{"coordinates":[2956.5,10099.5],"type":"Point"},"properties":{"mapID":"26","providerID":0,"group":"pins","description":"X/Y: 2956,10099 ","plane":0,"icon":"greenPin"}},{"type":"Feature","geometry":{"coordinates":[2961.5,10099.5],"type":"Point"},"properties":{"mapID":"26","providerID":0,"group":"pins","description":"X/Y: 2961,10099 ","plane":0,"icon":"greenPin"}},{"type":"Feature","geometry":{"coordinates":[2968.5,10101.5],"type":"Point"},"properties":{"mapID":"26","providerID":0,"group":"pins","description":"X/Y: 2968,10101 ","plane":0,"icon":"greenPin"}}],"type":"FeatureCollection"}</maplink> |
5 Bloodveld | Yes | No | Yes |
|