Maniacal monkey/Strategies

Maniacal monkeys are among the highest xp/hour monsters for training Ranged (using chinchompas) or Magic (using burst/barrage spells on Ancient Magicks). Given their very low defensive stats, the optimal strategy is to maximise max hits and Prayer bonus. As Maniacal monkeys frequently drop 1-dose Prayer potions, using Protect from Melee provides a low click-intensive form of training on par with Nightmare Zone.
Requirements
- Partial completion of Monkey Madness II (reached Kruk's Dungeon).
- 43
 for Protect from Melee.
 - 45
 for chinchompas.
 - 62
 for ancient magicks multi-target spells.
Getting there

Maniacal monkeys are located in Kruk's Dungeon on Ape Atoll. The dungeon entrance is in the north-western part of the island. There are a few different methods to get there:
- After completion of Monkey Madness II, use the gnome glider to Ape Atoll and run south.
- Players who have not completed the quest will need to wear a greegree when getting there to avoid damage from aggressive monsters. Players can get there via the Ape Atoll Teleport on the standard spellbook and running west, or Ape Atoll Teleport on the Arceuus spellbook and running north.
To reach the best spot to kill maniacal monkeys, navigate to the second hole with vines, marked as a "2" in the map of Kruk's Dungeon. Climb down and head south-east until you reach a large room. Check if there are any other players currently present by right-clicking the hole and selecting the "Look-in Hole" option. Sharing a world is not recommended as it will reduce experience rates for both players.
General information
Use Protect from Melee at all times. Use the 1-dose prayer potions dropped by the maniacal monkeys to replenish Prayer points. Alternatively, players who have the bonecrusher can equip the dragonbone necklace or the bonecrusher necklace to restore Prayer points whenever needed.
When the maniacal monkeys lose aggression towards the player after roughly 10 minutes, run west along the south passage to the yellow box indicated on the map above. Once the adjacent maniacal monkeys start attacking you, the aggression has been reset and you may return to your training spot.
Players on a budget looking to recoup some of the money spent on runes or chinchompas, can at level 71 Hunter fill their inventory with Imp-in-a-box and bank 4-dose Prayer potions while dropping the leftover magic boxes. This assumes the bonecrusher necklace or the dragonbone necklace with a bonecrusher method is used, which removes the need for prayer potions. For example, a player ice bursting who leaves and returns after filling up on prayer potions after all the Imp-in-a-box have been used, can expect to be refunded about half the cost of the runes spent for that trip.
Even without the necklace, players may find it worth bringing a bonecrusher. Depending on the method used, a bonecrusher can provide as high as 40k prayer experience per hour.
Solo methods
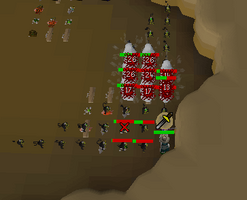
There are different methods to stack the maniacal monkeys for solo players. See the gallery below for the three most common methods. Higher click-intensity methods may provide higher experience rates as you will hit larger amounts of monkeys. While Ice Burst and Barrage hit a maximum of 9 targets, Chinchompas have a higher limit of 11 targets, making high-intensity methods more efficient and worthwhile when training Ranged compared to Magic.
-
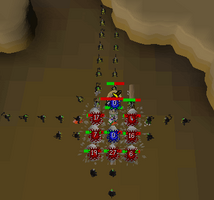 Low-intensity. Simply use auto-retaliate for all attacks. Run north-east and then back to this spot every few minutes to clump the monkeys as needed.
 -
 Medium-intensity. After each attack, click on a 3x3 clump of maniacal monkeys.
 -
 High-intensity. Ideal for chinning. Click back and forth after every attack to stack the monkeys as seen in the animated image. Use auto-retaliate.


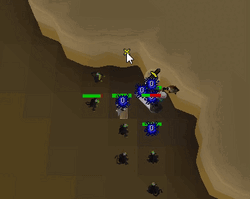
Using 2 dancing accounts
Maniacal monkeys can be stacked automatically by having 2 accounts follow each other in front of the player. This method allows the player to fully AFK without needing to run back and forth to stack the monkeys.
At first, the two accounts need to wait 10 minutes to lose the aggressiveness of the monkeys. After that, the second player should follow the first and then head to one of the stacking corners seen in the videos above. If the second player follows the first one at the right time, the characters will start moving around each other ('dancing'). This finishes the preparation, and now the account that wishes to train can run to one of the corners near the two dancing players, and the monkeys will be stacked automatically (this dancing movement is basically an automatic shuffling machine which stacks the monkeys).
To optimally shuffle, stand in one of the stacking corners. Visualize a 2x2 tile square wherein the player who is bursting is in the top right. The two accounts should be shuffling on the other 3 tiles. This can be done by simply having 1 stand still on the bottom right tile, one stand on the bottom left following the account on the bottom right tile, and the bottom right tile following the bottom left player. If done correctly, this can increase EXP rates by up to 20%. This can be especially helpful if the player often finds themselves running out of run energy while stacking.
Using the crystal halberd
Using the special attack of a Crystal halberd or dragon halberd when it is available, optionally with the death charge spell if training Ranged, provides ~50,000 experience per hour in Attack, Strength, or Defence while only slightly reducing magic or ranged experience and supplies used per hour - this can be efficient depending upon your goals. If using this method, it's advisable to prefer melee strength over prayer bonus or magic/ranged accuracy in slots where gear would not increase the Magic or Ranged hit - for instance, using a Mixed hide cape or a Fire cape over Ava's accumulator, or a Berserker ring (i) over a Ring of shadows. Bringing divine strength potions and switching your offensive prayer to your best strength-boosting prayer while using halberd specials is advised, as is bringing a Void melee helm if using void. Only equip the halberd when you'll be able to get off at least 3 special attacks in a row, to minimize time spent switching. It is possible to achieve four consecutive halberd specials if you find yourself at 95% special energy, with death charge off cooldown.
Using Ahrim's set
For low-budget/mid-level players who do not have the Ancient sceptre and high level armour such as Ancestral or Virtus, using the Ahrim's set with amulet of the damned can be a viable alternative. Not only does this provide the ability to autocast ancient magicks, amulet of the damned also provides a 25% chance to do 30% more damage. Contrary to popular belief, barrows armour does not degrade based on the number of attacks. Rather, it degrades purely based on time in combat. This allows the player to pay an additional 12k/hr (Ahrim's and AotD degradation costs) in exchange for the ability to achieve high rates for a fraction of the barrier-to-entry cost.
Detailed strategy by training method
Maniacal monkeys have a Magic defence of 1 and so increasing magical accuracy will increase hit accuracy by no more than 1%. Therefore, the objective is to increase the max hit of the spell with the largest magic damage bonus. The base hit of Ice Burst is 22. The maximum hit with all magic damage bonuses is 33. Items to bring for Ice Bursting are prioritised as follows:
- Equipment that increases max hit
- Equipment that increases prayer bonus
- Equipment that increases magical accuracy
Comparison
| No Staff of the dead | Staff of the dead (no autocast) | ||||
|---|---|---|---|---|---|
| Equipment | Increase | Max hit | Equipment | Increase | Max hit |
| 1 | 23 | 1 | 23 | ||
| 1 | 24 | 1 | 24 | ||
| 3 | 27 | 3 | 27 | ||
| 1 | 28 | 1 | 28 | ||
| 1 | 29 | 1 | 29 | ||
| 1 | 30 | 1 | 30 | ||
| 1 | 31 | 1 | 31 | ||
| 1 | 32 | 1 | 32 | ||
| 1 | 33 | 1 | 33 | ||
Equipment
Inventory
- Royal seed pod (or transportation to Ape Atoll and teleport out)
- Kandarin headgear (or any other light source, with tinderbox if necessary)
- Holy wrench (if you do not have a ring of the gods (i))
- Monkey greegree, if you have not completed Monkey Madness II
- Rune pouch optional - note that it can only hold 4,000 spell casts worth of runes
- 4 chaos runes per spell cast
- 2 death runes per spell cast
- 4 water runes per spell cast (not needed if you use a kodai wand)
- Optionally, a bonecrusher
- 4 prayer potion(4)
Experience rates are slightly variable by method used (see general information above). The following calculations are obtained from 6 hours of the low-intensity method. A reasonable number of casts/hr is 1085 as opposed to the theoretical maximum of 1200 given the time taken to loot prayer potions, position monkeys, as well as to leave and return to the area to restore aggro. Note that Prayer and Magic levels do not have a significant impact on experience rates.
- 1085 casts/hr
- Cost per hour using kodai wand: 671,398.00
- Cost per hour using master wand: 811,580
Exp/GP data table
| Max hit | Experience/hour | Gp/xp | |||
|---|---|---|---|---|---|
| 33(def) | 199300 | 117200 | 155900 | 3.37 | 2.12 |
| 32(def) | 194600 | 113700 | 151200 | 3.45 | 2.18 |
| 31(def) | 189800 | 110100 | 146400 | 3.54 | 2.24 |
| 30(def) | 185100 | 106600 | 141700 | 3.63 | 2.30 |
| 29(def) | 180400 | 103000 | 137000 | 3.72 | 2.37 |
| 28(def) | 175700 | 99400 | 132300 | 3.82 | 2.44 |
| 25(def) | 161500 | 88800 | 118100 | 5.03 | 3.24 |
| 24(def) | 156800 | 85200 | 113400 | 5.18 | 3.35 |
| 22(def) | 147300 | 78100 | 103900 | 5.51 | 3.60 |
| 33 | 277800 | 155900 | 2.42 | ||
| 32 | 270700 | 151200 | 2.48 | ||
| 31 | 263600 | 146400 | 2.55 | ||
| 30 | 256500 | 141700 | 2.62 | ||
| 29 | 249400 | 137000 | 2.69 | ||
| 28 | 242300 | 132300 | 2.77 | ||
| 25 | 221000 | 118100 | 3.67 | ||
| 24 | 213900 | 113400 | 3.79 | ||
| 22 | 199700 | 103900 | 4.06 | ||
Maniacal monkeys have a Magic defence of 1 and so increasing magical accuracy will increase hit accuracy by no more than 1%. Therefore, the objective is to increase the max hit of the spell with the largest magic damage bonus. The base hit of Ice Barrage is 30. The maximum hit with all magic damage bonuses is 46. Items to bring for Ice Barraging are prioritised as follows:
- Equipment that increases max hit
- Equipment that increases prayer bonus
- Equipment that increases magical accuracy
Comparison
| No Staff of the dead | Staff of the dead (no autocast) | ||||
|---|---|---|---|---|---|
| Equipment | Increase | Max hit | Equipment | Increase | Max hit |
| 1 | 31 | 1 | 31 | ||
| 2 | 33 | 5 | 36 | ||
| 5 | 38 | 2 | 38 | ||
| 1 | 39 | 1 | 39 | ||
| 1 | 40 | 1 | 40 | ||
| 2 | 42 | 2 | 42 | ||
| 1 | 43 | 1 | 43 | ||
| 1 | 44 | 1 | 44 | ||
| 1 | 45 | 1 | 45 | ||
| 1 | 46 | 1 | 46 | ||
Equipment
Inventory
- Royal seed pod (or transportation to Ape Atoll and teleport out)
- Kandarin headgear (or any other light source, with tinderbox if necessary)
- Holy wrench (if you do not have a ring of the gods (i))
- Monkey greegree, if you have not completed Monkey Madness II
- Rune pouch optional - note that it can only hold 4,000 spell casts worth of runes
- 2 blood runes per spell cast
- 4 death runes per spell cast
- 6 water runes per spell cast (not needed if you use a kodai wand)
- Optionally, a bonecrusher
- 4 prayer potion(4)
Experience rates are slightly variable by method used (see general information above). The following calculations are obtained from 6 hours of the low-intensity method. A reasonable number of casts/hr is 1085 as opposed to the theoretical maximum of 1200 given the time taken to loot prayer potions, position monkeys, as well as to leave and return to the area to restore aggro. Note that Prayer and Magic levels do not have a significant impact on experience rates, however having 77 prayer for augry makes the bonecrusher necklace comparable in DPS to the Occult necklace, without losing prayer points if AFK.
- 1085 casts/hr
- Cost per hour using kodai wand: 984,963.00
- Cost per hour using master wand: 1,191,330
In order to provide reference experience rates and costs, the experience per hour here is calculated by extrapolating from Ice Bursting data (scaling based on damage). However, this data is representative.
Exp/GP data table
| Items | Max hit | Experience/hour | Gp/xp | |||
|---|---|---|---|---|---|---|
| 46 | 273700 | 163400 | 217300 | 3.60 | 2.25 | |
| 45 | 269000 | 159800 | 212600 | 3.66 | 2.30 | |
| 44 | 264300 | 156300 | 207900 | 3.73 | 2.34 | |
| 41 | 250100 | 145600 | 193700 | 3.94 | 2.49 | |
| 40 | 245400 | 142100 | 189000 | 4.01 | 2.54 | |
| 39 | 240700 | 138500 | 184200 | 4.09 | 2.60 | |
| 35 | 221800 | 124300 | 165300 | 5.37 | 3.44 | |
| 34 | 217000 | 120800 | 160600 | 5.49 | 3.53 | |
| 33 | 212300 | 117200 | 155900 | 5.61 | 3.62 | |
| (def) | 30 | 198100 | 106600 | 141700 | 6.01 | 3.91 |
| 46 | 383200 | 217300 | 2.57 | |||
| 45 | 376100 | 212600 | 2.62 | |||
| 44 | 369000 | 207900 | 2.67 | |||
| 41 | 347700 | 193700 | 2.83 | |||
| 40 | 340600 | 189000 | 2.89 | |||
| 39 | 333500 | 184200 | 2.95 | |||
| 35 | 305000 | 165300 | 3.91 | |||
| 34 | 297900 | 160600 | 4.00 | |||
| 33 | 290800 | 155900 | 4.10 | |||
| 30 | 269500 | 141700 | 4.42 | |||
Prayer bonus vs Ranged attack bonus
Maniacal monkeys have a Defence level of 10. Because of this, equipping best-in-slot ranged accuracy gear versus no items at a Ranged level of 80/99 will only increase accuracy by 0.75%/0.60%. In the worst case scenario, this translates to a negligible 14 missed hits per hour.
Because of this, prioritizing prayer bonus over ranged accuracy results in 23-42 fewer prayer potions doses per hour or less time spent without a necklace of anguish equipped if using the bonecrusher method. If you instead use max ranged bonus gear and are able to pick up prayer potions and continue throwing chinchompas without losing any ticks or unstacking the monkeys significantly, you would gain no more than an extra 5,000 experience per hour. It is much more likely that players will spend more time picking up and consuming prayer potions than the minimal extra damage output of ranged accuracy gear. For this reason prayer bonus gear is considered superior to having higher ranged accuracy, and it also makes training less intense.
The lone exception to this may occur at certain ranged levels and with certain setups (DPS calculation required) when the player does not gain a max hit from wearing the necklace of anguish. In this specific case, wearing the bonecrusher necklace with a preference for high ranged accuracy equipment over prayer bonus (ex: pegasian boots, archers ring (i)) becomes slightly better, as your prayer will remain almost full the entire time due to the effects of the bonecrusher necklace.
Equipment
Inventory
.png)
- Transportation to Ape Atoll and teleport out such as royal seed pod
- Light source such as Kandarin headgear, Firemaking cape or bullseye lantern
- Monkey greegree if you have not completed Monkey Madness II
- Bonecrusher necklace switch for restoring Prayer points (recommended)
- Stamina potion (4) and divine ranging potion (4)
- If not using dancing accounts, bring approximately a 2:1 ratio of stamina and divine ranging potions (e.g. 14 staminas and 7 divine ranging potions), assuming you re-pot every 5 minutes. Anticipate approximately 5 minutes per stamina potion dose.
- If using dancing accounts to stack the monkeys, only bring 1 stamina potion to get to the area and the rest divine ranging potions.
- 1-2 prayer potion (4)
- Holy wrench (only if picking up prayer potions and you do not have a ring of the gods (i))
- Chinchompas are lost on death, so it is advised to only bring whatever amount of chinchompas is needed per trip. Players can throw around 1,900 chinchompas per hour on Medium fuse (Rapid), so 11,400 chinchompas would be needed for 6 hours of chinning.
In order to reach maximum experience rates, you should actively stack the maniacal monkeys so that each attack hits the maximum number of targets. This can be automatically done by using 2 dancing accounts.
- 1866 chinchompas/hr (with Medium Fuse, equivalent to Rapid)
- Cost/hour using chinchompas: 1,895,856
- Cost/hour using red chinchompas 3,328,944
- Cost/hour using black chinchompas 6,991,902
In order to provide reference experience rates and costs, the experience per hour here is calculated by extrapolating from red chinchompa data at Ranged levels 80-90, a Prayer level of 99, while using Ranged potions every 6 levels, with Protect from Melee, Preserve and Eagle Eye activated, with the best-in-slot prayer and ranged gear as described above. Experience rates for low levels may be slightly higher due to fewer monkey overkills, and conversely experience rates for high levels may be slightly lower due to overkills. These experience rates assume using the high-intensity training method described above.
- Having no necklace of anguish reduces experience rates and increases costs by about 10%.
- Using Rigour instead of Eagle Eye should increase experience rates and reduce costs by about 7%, assuming no additional time is spent gathering prayer potions. Realistically, costs should be reduced by about 7% but the experience rate would be increased by less than 7%.
- Using long-ranged for defensive chinning, the gp/xp for Ranged+Defence combined should be the same, but expect 37.5% the experience rate for Ranged as well as Defence each (e.g. 600,000 experience per hour on rapid would translate to 225,000 experience per hour for Ranged as well as Defence while on long-range)
- Using the method with dragonbone necklace and bonecrusher mentioned above will give almost the same experience rates as in the table below.
| Weapon | |||||
|---|---|---|---|---|---|
| 45 | 269100 | 89700 | 144.2 | 7.04 | |
| 45 | N/A | ||||
| 45 | N/A | ||||
| 55 | 340100 | 113400 | 182.3 | 5.57 | |
| 55 | 411600 | 137200 | 220.6 | 8.09 | |
| 55 | N/A | ||||
| 65 | 376800 | 125600 | 202 | 5.03 | |
| 65 | 483100 | 161000 | 258.9 | 6.89 | |
| 65 | 553400 | 184500 | 296.6 | 12.63 | |
| 75 | 447700 | 149200 | 239.9 | 4.23 | |
| 75 | 554500 | 184800 | 297.2 | 6.00 | |
| 75 | 625100 | 208400 | 335 | 11.19 | |
| 85 | 484200 | 161400 | 259.5 | 3.92 | |
| 85 | 591300 | 197100 | 316.9 | 5.63 | |
| 85 | 731800 | 243900 | 392.2 | 9.55 | |
| 95 | 555500 | 185200 | 297.7 | 3.41 | |
| 95 | 663000 | 221000 | 355.3 | 5.02 | |
| 95 | 803800 | 267900 | 430.8 | 8.70 | |
| 99 | 556000 | 185300 | 297.9 | 3.41 | |
| 99 | 698400 | 232800 | 374.3 | 4.77 | |
| 99 | 839400 | 279800 | 449.8 | 8.33 | |