Chambers of Xeric/Strategies
The Chambers of Xeric is Old School RuneScape's first Raid.
Requirements
- Access to Great Kourend and Mount Quidamortem
Suggested skills
 80+
80+  80+
80+  80+
80+  70+
70+  80+
80+  80+
80+  77+ for Piety, Rigour, and Augury
 55+ to farm Noxifer, Buchu, and Golpar
 78+ to prepare stronger Xeric's aids, Revitalisations, and Prayer enhances
- 90+ to make your own Overload+ potions
 30+ to build Storage units
 60+ for increased damage against Guardians
 60+ for increased Kindling yield and damage against the Meat tree
 60+ for an increased chance to open the Chest for more Cavern grubs.
Getting there
Players can reach Mount Quidamortem for the first time quickly in a few ways.
- Taking the Lovakengj Minecart Network
- Using Fairy ring BLS then running north past the Mountain trolls
- Heading west from Shayziens' Wall through the Lizardman Settlement and up the mountain.
- Heading south from the Farming Guild through the Lizardman Settlement and up the mountain.
Once the player has reach the mountaintop for the first time, they can speak to the Mountain Guide to unlock a shortcut via the other guide at Shayzien's Wall and next to the southern Fairy ring.
Players who have completed The Chambers of Xeric may receive an Ancient tablet. When used on a Xeric's talisman, it will permanently unlock the Xeric's Honour teleport which is the fastest way to reach the mountaintop.
Overview
The Chambers of Xeric is a scalable encounter in that the team's stats and party size upon starting the raid will determine the strength of enemies and quality of resources found inside. Captain Rimor can be spoken to scale the raid appropriately if no one is above level 115. Each raid consists of three floors; two floors of randomly-generated rooms and the last floor which contains the Great Olm, the final boss of the raid.
There are two layouts that the host can choose from: normal or large sized raids. The first two floors consist of seven rooms which consist of the entrance, exit, resource room, one or two scavenger rooms (with a minimum of one large scavenger room for two scavenger rooms) and 2-3 combat/puzzle rooms. In large raids, these two floors will always be filled to the brim with eight rooms, consisting of the entrance, exit, resource room, one scavenger and four puzzle/combat rooms. Large raids, being completely filled out, may occasionally have a duplicate puzzle room; boss rooms will never be duplicated.
If the raid layout is not satisfactory for the player, they can reset the layout inside the raid by right-clicking the stairs, select the "reload" option and confirm the selection. This avoids the need to leave the instance, run back to the recruiting board and setting up the party again.
Combat rooms are considered to be Vespula, Tekton, the Muttadiles, Vasa Nistirio, Vanguards, Skeletal Mystics, Lizardman shamans and Guardians. Puzzle rooms are considered Crabs, tightrope, Ice demon and the Corrupted scavenger (thieving).

Energy pools can be found scattered throughout the raid at three rooms; scavengers, resource and the end of the floor for the first two floors. These pools, when interacted with, will fully restore run energy.
Upon entering the next level, the respawn point will be changed accordingly; dying on the first floor places players back at its beginning, while having entered the second floor will move it to the end of the first floor, and having entered the final floor likewise moves the respawn point to the end of the second floor.
Expected times will greatly vary depending on player experience, prep times and team size.
Deaths are considered safe for all players (including Hardcore Ironmen players except those part of Group Hardcore Ironmen). All raid-unique items (potions, planks, food) are dropped on death.
After clearing the Chambers of Xeric, players must empty their personal storage before being able to re-enter. They can do so from the storage unit next to the bank chest in the lobby area or attempt to re-enter the Chambers, in which the interface shows.
Points
Points gained from the raid are based on player contribution and actions. They can get points from the following:
- Attacking monsters, though there are several exceptions:
- Penultimate phase of the Great Olm; anytime it regains control of its hands, no points are given for any damage dealt to them.
- Damaging a recovered abyssal portal.
- When players battle mini-bosses, a "decay" point multiplier is put into effect.
- Completing puzzle rooms.
- Making shortcuts in large ruin chambers
- This consists of either a boulder (Strength), rocks (Mining) or a rotten sapling (Woodcutting). The latter two require a pickaxe and axe respectively. The skill requirement is the average respective level of the team, plus or minus 2, capped at 99.
The points determine the team's potential rewards at the end of the raid when the Great Olm is killed. The more points obtained, the higher the chance of obtaining unique loot. The more players in a raid attempt, the higher the points multiplier will be to compensate for increased difficulty. If members of the team leave, the points multiplier will decrease but the difficulty will remain the same to prevent players from exploiting additional points in smaller groups.
If a player dies in the chambers, they will lose 40% of their score as a penalty. For every 8,675 total points obtained, a 1% chance to obtain a unique loot is given. This chance is capped at 65.7% (570,000 points) - any further points will be sent to roll for a second unique loot. For example, a team which possesses 855,000 points in total has a 65.7% chance to receive a unique loot, and then a 32.85% chance to obtain a second unique loot. Up to six unique rewards can be obtained per raid, assuming that there are enough points to roll for them.
Note: If a team member dies in the raid with low points, the game will deduct 5% of the team's points to discourage suiciding supplies into the boss rooms for other players.
Equipment
Note: The equipment layouts below is for melee only, with magic and ranged switches in the player's inventory due to all three combat styles being required.
- ^ 1.0 1.1 1.2 As a set, it is the second-best option available, clearing Olm and Tekton with ease when using crush weapons.
- ^ Tassets are an extremely minor upgrade since they only give a max hit at Tekton.
- ^ 3.0 3.1 3.2 Bring a stab weapon such as a dragon sword, abyssal dagger, osmumten's fang, or ghrazi rapier for Vasa crystals
- ^ Depending on your stats, scale, and spec weapon usage, fang can be better than a whip. Avoid bringing into olm if your team has a Bandos Godsword.
- ^ 5.0 5.1 5.2 The special attack of this weapon is guaranteed to reduce the defensive stats of Tekton, regardless of whether or not a successful hit is rolled.
- ^ 6.0 6.1 With the additional special attacks granted by the Lightbearer, the Bandos godsword is better than the Elder maul or Dragon warhammer.
| Slot | Item (most effective → least effective) | |||
|---|---|---|---|---|
| Any melee helmet | ||||
| N/A | N/A | |||
| N/A | ||||
| N/A | ||||
| File:Dragon arrow.pngDragon arrow | File:Ruby dragon bolts (e).pngRuby dragon bolts (e) | File:Ruby bolts (e).pngRuby bolts (e) | N/A | |
| N/A | ||||
| N/A | N/A | N/A | ||
| See Melee | N/A | N/A | N/A | |
| N/A | N/A | N/A | ||
- ^ 1.0 1.1 Additional accuracy switches for helmet/offhand/boot slots are incredibly minor timesaves, an extra brew is almost always more useful
- ^ 2.0 2.1 2.2 2.3 Elite void ranged is marginally better than Armadyl armour in raids that don't feature Skeletal Mystics or Vespula
- ^ 3.0 3.1 3.2 Bring whenever using crossbows, other offhands do not give damage bonus and are not worth bringing
- ^ The special attack should only be used if you don't need to use a defence lowering special attack in the next rooms. However it should always be brought regardless of your main ranged weapon due to it being better in many rooms
| Slot | Item (most effective → least effective) | |||
|---|---|---|---|---|
| Any melee helmet | N/A | N/A | ||
| N/A | N/A | |||
| N/A | N/A | N/A | ||
| N/A | ||||
| N/A | ||||
| See Ranged | N/A | N/A | N/A | |
| N/A | N/A | |||
| Camp/Takeoff melee boots | N/A | N/A | N/A | |
| See Melee | N/A | N/A | N/A | |
- ^ Ancestral hat is only worth bringing if it raises your max hit.
- ^ 2.0 2.1 2.2 The addition of thralls makes powered staves better than the Harmonised Nightmare staff
- ^ Only used with fire surge, tome of fire, and full ancestral
- ^ Only brought if using thralls
- ^ Only brought if using a Harmonised Nightmare Staff or if Ice Demon is in the raid
- ^ Extremely minor switch for teams, mainly brought for its defensive bonuses in solos
Setups
- ^ The Bandos Godsword special attack drains more defence than the Elder maul's special attack after two hits or more have successfully landed.
- ^ If a scythe is being used, bring a stab weapon for raids containing Vasa.
- ^ Additional items brought to speed up the raid include: Zaryte crossbow + Ruby bolts (e), Voidwaker, Dragon claws, Lockpick, Zgs + Entangle, Fire Surge.
Combat
There are several enemies that can be encountered in a raid which fall under the "combat" category. The Great Olm is the last boss encountered in the raid.
List of bosses:
While not bosses, these are still considered combat encounters:
When a combat encounter is completed (outside of Olm), a message will appear indicating which player dealt the most damage in the encounter. The potion and seed supplies they drop can be picked up by anyone, including ironman players even if the main damager was not an ironman. The only exception is Tekton's rare onyx drop.
Tekton

Tekton has a fairly high Defence but only uses Melee attacks. His attacks can deal heavy damage if not protected against, and will hit all players in front of and to his right side. Tekton takes full damage from melee, 20% from magic and is immune to ranged attacks. He is weakest to crush attacks.
Players can avoid all damage from Tekton's attacks by either using the running or flinch-hitting method. The running method involves the player running counter-clockwise whenever Tekton is facing them. This can consume a large amount of run energy, but is beginner friendly. The flinch-hit method requires players to bait Tekton into attacking, but then walking out of range before the attack registers. Tekton attacks on a three tick cycle, so the flinch-hit method should only be used if experienced as a mistake will likely result in high damage.
After 10-14 attacks or if nobody is in range when he scans, he will return to the anvil. A player who remains under Tekton while he returns to his anvil will take rapid stomp damage. He can still be attacked as he makes his way back to the anvil. For this reason, it is recommended to lure Tekton as far away as possible for additional attacks.
When Tekton goes back to the anvil, he will repair himself, recovering minor health every few ticks. While he is at the anvil, he will send two sparks flying for each player in the chamber, which have a 3x3 AoE and will deal 10-20 damage to anyone hit by them. They can be avoided by simply running two spaces away from your current spot when the sparks are flying. After up to five sets of sparks, he will stop repairing himself and enter an enraged state, increasing his melee defensive bonuses and max hit. This will wear off around ~5 or so attacks he makes afterwards.
The first special attack made by a dragon warhammer or elder maul will always hit regardless of the player's accuracy bonuses. The bandos godsword can technically drain more Defence from Tekton, however it is not guaranteed a hit and should only be used if the player does not have a dragon warhammer or elder maul. In the event that multiple hammer specials land on the same tick, the player with the highest PID will land. Even then, missed warhammer/maul and godsword special attacks are not a complete loss; missed warhammer/maul specials drain 5% and godsword specials drain 10 Defence levels from him.
Tekton drops five stinkhorn mushrooms, two overload (+) along with a single revitalisation (+) and prayer enhance (+) upon death. There is a rare chance for an onyx to be dropped.
| Slot | Item (most effective → least effective) | ||||
|---|---|---|---|---|---|
- ^ Crush with inquisitors, otherwise slash with bellator
Vespula


In the chamber will be Vespula herself, four lux grubs and an abyssal portal. The portal must be destroyed to dispel Vespula and her offspring.
Vespula is in a flying state when first encountered and must be attacked with ranged or magic. Tendrils will appear to block off the entrance as soon as the fight starts, damaging players if they attempt to leave the room through them. Upon reaching 20% of her health, she will drop to the ground and can be attacked with melee, although as stated above, the portal must be destroyed to end the encounter. Vespula attacks with ranged and can inflict poison starting at 20 damage.
While flying, Vespula will periodically sting the grubs, causing their health to degrade. Should they lose all their health, they will transform into a vespine soldier, healing both Vespula and the portal while they are alive. They function similarly to Vespula in combat and are also capable of inflicting poison starting at 15 damage. Once they drop to the ground, kill them with melee as they will explode after 20 seconds for moderate damage. The grub will respawn soon after the soldier dies. At the other end of the boss chamber are multiple Medivaemia blossom plants which can be picked to heal the grubs.
The abyssal portal is located deeper in the room and requires weapons with a range of 7 or greater in order to be attacked. It shares the same Defence and Magic levels, although it is slightly more resistant to ranged. The portal will attack players with a green crescent projectile if a player is within range (a reach of 7 tiles) that drains 3 prayer points on hit; if the player has no prayer points, it deals 3 damage instead. Tumeken's shadow, the Eldritch nightmare staff and longbows can reach the portal at any setting; any other powered staff and crossbows will require the long range setting to avoid getting hit by the portal.
If the portal is attacked while Vespula is flying, she will become enraged and head straight to the portal area, jabbing wildly with her stinger. This will deal heavy melee damage to anyone standing next to her, while anyone underneath her will take rapid stomp damage of 2-8 damage every tick.
The normal method to clear the room is to have one player feed the grubs while whittling Vespula's health down, then attacking the portal when she is forced into the ground. The more ideal method is the Redemption method, which is significantly faster, albeit with more damage incurred and requiring 90+ Hitpoints in order to use it. This method is best combined with a prayer enhance potion, though if none are available, an extra prayer potion should be taken instead. While using this method, the player will attack the portal once every 4 or 5 ticks (depending on their weapon), then run back out and away from Vespula's melee range, repeating until the encounter ends. The player will generally incur 3 hits of stomp damage, which can deal anywhere from 6-24 damage per player attack. Make sure to have Redemption active before attacking the portal to avoid dying, which will likely result in vespine soldiers hatching and healing the portal back to full.
| Slot | Item (most effective → least effective) | ||||
|---|---|---|---|---|---|
Upon destroying the portal, two Xeric's aid (+) and a single Revitalisation (+), Overload (+) and Prayer enhance (+) is dropped. Unlike the other demi-bosses in the raid, Vespula's potions will not contribute points when consumed, allowing them to be safely consumed without hitting the potion points cap.
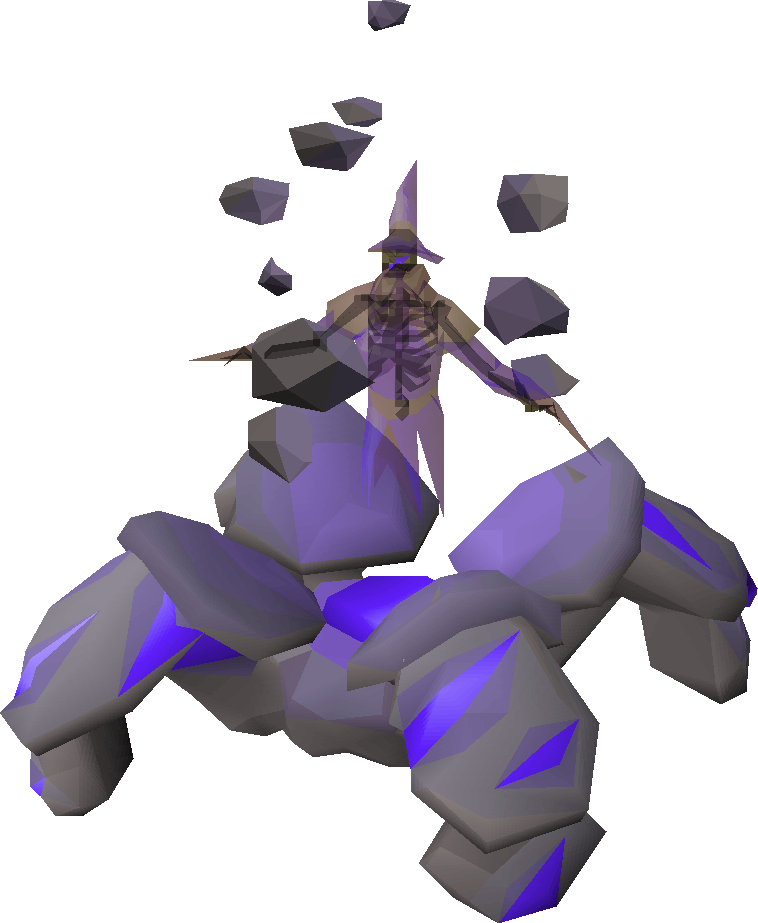
Vasa Nistirio


 The fight starts as soon as a player approaches Vasa's pile of rocks. He will animate, immediately summon a fire barrier at the entrance and perform his teleport attack.
Vasa's teleport attack will grab all players in the room and next to the fire, teleporting half next to him and half to the edges of his arena; if one player is in the room, they will always be teleported next to him. Any players teleported to him will be stunned and unable to use prayers until the attack concludes. He will launch projectiles next to him that deals varied damage (accumulated health of teleported players - 5 / number of players next to him). Players not affected by the teleport can run next to Vasa to further weaken the damage towards the stunned players, although they will take damage themselves unless Protect from Magic is used. This damage can be recoiled with Vengeance, though this will not yield any points. If the player is not using Vengeance and Vasa is the first encounter, they should drain their health with self-damaging items like a locator orb to 10 health.
Vasa will then activate one of the glowing crystals in the corners of the chambers and walk his way over to it. He will also throw boulders at all players within 9 tiles of him, launched at the players' position at the time of the attack. The boulders have a 3x3 AoE and can deal heavy damage; using Protect from Missiles reduces their accuracy and damage. When he reaches the crystal, he becomes invulnerable to damage and stops attacking as he begins to heal; indicated with green hitsplats. If allowed to fully heal, they will restore his health as purple; if crystal is destroyed before it does, the healing is nulled.[1] He will also restore (10% + 1) Defence off the crystal. He will also deal rapid stomp damage to anyone underneath him. When not at full health, it is important to eat to tank the weakened blast damage; failing to do so will result in a high chance of death either from his ranged attacks or from getting stomped on if Vasa moves towards the direction the player is running from.
The crystals are immune to ranged attacks and take 66% less damage from magic attacks, making melee the only viable option. They are highly resistant to slash and crush, so stabbing weapons are recommended. If the team takes too long in disabling the crystal, Vasa will do so himself and perform his teleport attack upon returning to the centre of the room. If the team disables it in time, Vasa will still return to the centre of the room, but immediately select another crystal to heal off of. The speed in which he drains the crystal will increase for each one disabled to the point that it is generally impossible to disable every third crystal in a sequence. If Vasa finishes draining the crystal, the drain timer resets.
Vasa is weakest to crush, although he is only slightly more resistant to ranged. It is still recommended to use range to minimise damage taken during the encounter. While Vasa is a fairly easy boss, players without optimal equipment may find themselves using lots of supplies.
| Slot | Item (most effective → least effective) | ||||
|---|---|---|---|---|---|
- ^ Jagex. Mod Ash's Twitter account. 19 May 2020. Archived from the original on 1 September 2023. Mod Ash: "Every 2 ticks, it heals 1% HP and (10% + 1) Defence."
- ^ 2.0 2.1 2.2 Only brought if using a scythe of vitur or an abyssal tentacle as a mainhand weapon
Upon death, Vasa drops two Xeric's aid (+), an overload (+) and twisted (+).
Vanguards
The Vanguards consist of three separate entities; one melee, ranged and magic Vanguard. The melee Vanguard has its tentacles flailing out, the ranged Vanguard has some tentacles flailing out and others holding rocks, and the magic Vanguard has its tentacles retracted. These Vanguards are weak to the respective combat style in the combat triangle, though the ranged Vanguard is weakest to stab attacks, only slightly more resistant to slash, and is strongest against crush attacks.
All Vanguards can attack three times, although only the melee Vanguard guarantees three hits per attack, with a lower max hit as a result. The ranged and magic Vanguards also hit three times, but only one of these always hits their target with the other two being launched elsewhere, though it is possible to get hit by two or even all three attacks at once. Protection prayers significantly reduce the accuracy and damage of these attacks.
The ranged Vanguard is also a semi-solid NPC; players can walk under it, but it is incapable of moving out to attack them, meaning that the player can focus on the magic or melee Vanguards after dealing enough damage to the ranged one. Depending on the layout of the room and the player's positioning, the melee Vanguard can be safespotted.
Working in tandem in their old lives, they continue to do so in their current form. The Vanguards are magically linked to each other and will gauge their fellow kin's health. As each individual's health strays further from the others, a spiraling mass of energy will appear. This is initially dark and will grow brighter in colour as the difference becomes greater. The value before a forced heal is 33.3% in groups of five and higher, and 40.0% in groups of four or lower. If this value is exceeded, all Vanguards will force a shuffle and fully recover all lost health. Due to this healing mechanic, players should be careful when using high-hitting weapons like Tumeken's shadow to avoid resets, and making less gear/pray switches to lower the max hit may be useful.
The Vanguards will periodically shuffle around when a member is being fought, with this time varying though increasing the longer they persist. They will all shuffle in one direction either clockwise or counterclockwise, and cannot be targeted during this animation, though attacks that were made before they retreat into their shell will still land and damage them. Players in their path will take 3-6 rapid stomp damage every few ticks, and the Vanguards will not exit out of this state until all members are in position. Therefore, it is not recommended to lure the melee Vanguard too far away as this will inconveniently stall times. If a fatal hit would land on the Vanguard as they shuffle around, they will restore 1 health.
In solo encounters, the player will have to chase after the Vanguard with the most health, so run around the edges to avoid grabbing unnecessary attention. In group encounters, players can simply swap gear as needed for the Vanguard coming into their position.
The Vanguards are a fairly easy but somewhat time-consuming encounter due to the unique healing mechanic that results in slower kills.
The Vanguards will all drop specific sets of potions on death; each Vanguard drops their respective combat potion. The melee Vanguard will also drop two Xeric's aid (+), the ranged Vanguard will drop one Xeric's aid, two Revitalisation (+) and the magic Vanguard will drop one Xeric's aid, one Revitalisation and one Prayer enhance (+). One of these three will also guarantee an Overload (+), though the other two also have a chance to drop it. This makes them very useful for no-prep runs, as the player is not likely to consume a large amount of supplies compared to other bosses while gaining vital potions.
| Slot | Item (most effective → least effective) | ||
|---|---|---|---|
| Slot | Item (most effective → least effective) | ||||
|---|---|---|---|---|---|
| Slot | Item (most effective → least effective) | |||
|---|---|---|---|---|
- ^ Only with a full set of crystal armour.
- ^ When under the status of the Overload (+) potion, Shadow outperforms the twisted bow.
-
 A trio of players fighting the Vanguards.
 -
 It is important to remember which Vanguard is which for fighting them.
 -
 A Vanguard warning the player that the health difference between them is too great.


Guardians

Two Guardian statues are guarding a passageway deeper into the chambers. The statues must be destroyed, as they will shove players away from the passageway if they try to get past them. They can only be harmed through pickaxes; all other damage will be reduced to 0, although secondary effects (such as debuffs and healing) will still go through as normal.
A permanent iron pickaxe spawn can be found next to the guardians for players who had forgotten or did not bring a pickaxe.
| Slot | Item (most effective → least effective) | ||
|---|---|---|---|
- ^ The crystal pickaxe is lighter than the dragon pickaxe, but this is the only way in which it is better
The Guardians attack with a cleaving melee attack and can occasionally stomp the ground, making a rock fall from the ceiling, which deals moderate to heavy damage in a 3x3 area on their target's current position when the attack was performed. Due to this stomping attack, it is highly recommended to flinch them to reduce the amount of damage taken. When flinching, run two tiles away from the Guardian immediately after attacking so that the stomp attack can be completely evaded if it manages to retaliate back.
While damage against the Guardians is based on the player's Mining level and pickaxe used, the boost from the dragon pickaxe special attack does not give any significant speed increase. It is better to save special attack energy for other rooms. The guardians are highly resistant towards stab and slash attacks, so set the pickaxe to a crushing option.
Guardians drop 3-5 each of buchu, noxifer and golpar seeds upon being destroyed.
Lizardman Shamans

A small room filled with at least two lizardman shamans (dependent on party size, although capped at 4) are in the room, with several spawns blocking the way forward. They share the same mechanics as the shamans outside, although their poison spit can deal up to 40 damage.
There are several layouts for the shaman room. When nearing a room with lizardman shamans, one or two sets of spirit tendrils will appear to avoid players from safespotting them away from the chamber. The chamber itself does have safespots against the shamans, though players will need to attack the shamans first in order to lure them. It is recommended to use a long-ranged weapon such as a crossbow, ballista or twisted bow; a weapon with a range of 10 can safespot the shamans from afar. Experienced players can use a blowpipe on them, although they will need to be cautious of poison splatters, spawns and their frequent habit of jumping around. As the shamans can inflict poison starting at 12 damage, a sanfew serum is recommended for this room regardless if safespotting or not in the event that they do manage to hit the player with their standard attacks, as the poison damage will rapidly stack over time if not cured.
The shamans drop 5-10 each of buchu, noxifer and golpar seeds upon death.
Skeletal Mystics
A sacrifical chamber filled with at least three Skeletal Mystics (dependent on party size) are in the room, the mages are also blocking the way forward with a powered sigil. The mages attack with magic from distance and melee if players get close to them. They take the player's overhead prayers and defensive bonuses into account. Protect from Magic reduces the mystics' accuracy and damage by roughly 50%. The mages are equally weak to ranged and crush, but due to their melee attacks, it is recommended they be killed with ranged instead. A Salve amulet(ei) will help when using ranged or magic. Magic is only feasible when using Tumeken's shadow, and although bonuses of the salve amulet are not multiplied by the staff's passive, a salve(ei) will outperform an occult.
Have one mystic attack the team at a time to lower overall damage, as they are fairly accurate. A good tactic to save some supplies depending on the layout is to get up close to a mystic to prompt it to melee, then corner safespot the mystic wherever possible. This will result in the mystic attempting to melee the player, but will get stuck and drastically reduces the chance of a magic attack. If the mystic is using magic non-stop, it will no longer melee until prompted to do so again.
The mystics drop 5-10 each of buchu, noxifer and golpar seeds upon death. Once the last mystic is killed, three portals will appear throughout the room; one each at the start and end, and a last one in the middle to allow for fast teleportation across the room.
-
 Players fighting the skeletal mystics.
 -
 One of the possible layouts for the mystics room.
 -
 Skeletal mystics being "safespotted" by a player.


Muttadiles
Upon starting, several noxious tendrils will appear which deal damage to players who try to leave the chamber. There are also two Muttadiles; a small one walking around the chamber, and a second, larger Muttadile lurking in the water. A meat tree is also nearby.
The small muttadile only attacks with both Melee and Ranged, while the larger one uses all three and has a special shock wave attack that can deal massive damage; however, this attack is only used against players in melee range. During the fight with the small muttadile, the larger one will occasionally attack players in the chamber with Magic. Both muttadiles can hit extremely hard; protection prayers block the melee attacks, while only reducing their ranged and magic attacks. However, the pair are extremely notorious for their erratic movement.
When the muttadile reaches below 50% of its health, it will go to the meat tree and eat from it, restoring up to 40% of its health in the process. There are two ways to prevent this; chopping the tree down or binding them. It is highly recommended to chop the tree down when possible as it saves time and supplies as the muttadile will eat from the tree multiple times before stopping. Binding the muttadiles can be a bit more tricky, as while the small one can be easily frozen, the larger one requires a Zamorak godsword due to its significantly higher Magic level. The muttadile will prioritise attempting to eat the tree for ~15 or so seconds, after which it will give up and no longer attempt to eat the tree. They can still be damaged while frozen.
Chopping the tree uses the player's Woodcutting level as "accuracy"; the "damage" dealt to the tree is always static regardless of level or axe used, so higher Woodcutting levels makes destroying the tree faster and saves more supplies. The damage dealt is based on the player's Woodcutting level divided by 2, then +/-5 from that total. Prioritise ranged and magic defence to reduce the chances of either muttadile being able to hit; Augury or a combination of Steel Skin and Mystic Might (depending on what the player possesses) can further increase defence from both. Use Protect from Missiles whenever the small muttadile is not in melee distance and Protect from Melee if it is. After damaging the tree, attack the muttadile if it is in range until it reaches 55% of its health before chopping the tree down fully if it hasn't been felled before resuming combat.
When the small Muttadile dies, the large Muttadile will emerge from the water to attack. The larger muttadile attacks with all three combat styles; it can also perform a "stomp" attack in place of a melee attack that hits 50% higher than its normal melee attacks, indicated with it raising its front legs before slamming back down. When using ranged or magic, it will attack a minimum of three times before potentially swapping to another attack style, however it is not guaranteed to swap, so it is recommended to keep Protect from Missiles, as its ranged attack hits far higher and more accurately than the magic attack. Various "safespots", depending on the layout of the room, can be used to trap the muttadile and prevent it from using its melee and stomp attacks.
While a fairly simply and easy encounter, the muttadiles can consume lots of supplies due to their erratic behaviour and hitting far harder than the other pre-Olm bosses.
The small muttadile drops an Overload (+), Prayer enhance (+) and 1-2 stinkhorn mushrooms upon death. The larger one retains the smaller's drops apart from the mushrooms, which is replaced with a Xeric's aid (+) and Revitalisation (+).
| Slot | Item (most effective → least effective) | |||
|---|---|---|---|---|
| Slot | Item (most effective → least effective) | |||
|---|---|---|---|---|
- ^ Only with a full set of crystal armour.
-
 A group of players fighting with the Muttadiles.
 -
 One of the possible layouts for the Muttadile room.


Great Olm

The Great Olm is the last boss in the raid.
In most small teams, each player should have at least one overload, one prayer enhance, 2-3 restores and 6-7 brews. If overloads are not sufficient and extras are not made, the team should share the doses, as Olm is generally expected to be cleared within 10 minutes. Players looking to learn solo methods are advised to limit the amount of gear switches, and to prep at the earliest farming room to be able to bring as many stamina potions as possible. Once at Olm, players can practice learning the solo methods indefinitely, as long as the player makes sure not to kill both hands within ~30 seconds of each other on phase 3. Suiciding supplies into the Olm room is severely ill-advised, as this will hamper overall points.
In a team size of 1-7, Olm has four phases in total, three standard phases and a head phase. For every 8 players, Olm will gain an additional standard phase, which simply reuses one of the three powers from before. This guide assumes that the Great Olm has four phases.
Before starting, ensure that all supplies and equipment have been taken along as the player cannot leave the arena during the fight outside of death.
Olm consists of three NPCs in one; its head and both its left and right arm. The head is the NPC responsible for attacking players and using phase-specific mechanics. Olm only attacks with magic and ranged; the magic attack consists of a dark-green dragonfire projectile, while the ranged attack is a small chunk of crystal. There is a 1/5 chance for Olm to change combat styles after making an attack.[1] The head has 66% damage mitigation from all non-range attacks, and will restore any damage to full if attacked outside the final phase. These attacks will hit all players that Olm is looking at. The right hand, commonly refered to as the mage hand, has 66% damage mitigation from all non-mage attacks. The left hand is the NPC responsible for the generic mechanics (and heal in the penultimate phase), taking full damage from melee attacks and takes 66% less damage from ranged and magic.
Alongside his basic ranged/magic attacks, Olm has the following abilities at its disposal:
- Spheres: Olm randomly picks a sphere (red, green or purple) and sends it at the player. If not blocked, the player will be damaged for 50% of their current Hitpoints. If a protection prayer was used when the sphere was launched, it is disabled and the player's Prayer is reduced by 50%. To block the attack, pray accordingly before the sphere hits:
- Red (sphere of aggression): Protect from Melee
- Green (sphere of accuracy and dexterity): Protect from Missiles
- Purple (sphere of magical power): Protect from Magic
Olm also possesses power specific abilities which can replace his spheres or basic attacks. Each phase will only feature one power; Olm will not switch powers during a phase, this is communicated to the player through the chatbox. Ex: "The Great Olm rises with the power of Acid!"
- Acid:
- Acid Spray: Olm spits out several pools of acid around the chamber. Standing on top of an acid pool deals 3-6 damage per tick and inflicts poison starting at 2 damage.
- Acid Drip: Olm covers a player in acid, causing them to generate acid pools under them. Standing still will deal damage and moving will generate more pools. The pools damage are the same as the spray attack.
- Flame:
- Burn With Me!: Olm shoots out a green fireball at a player, causing them to yell "Burn with me!". The targeted player takes 5 damage every few ticks, dropping stats by 2 each time this occurs for six hits. If it spreads to other players, it will reset the timer and newly infected players will initially yell "I will burn with you."
- Fire Wall: Olm shoots out two walls of fire at a player to trap them. If the player is on a tile that would be occupied by the fire wall, they will leap out and take up to 10 damage from it. After the walls are placed, the player(s) trapped inside will take 50-65 damage if they don't run out in time. To free the trapped player(s), click on a segment of the wall whilst being able to cast water spell, ice spell or humidify to douse the flame. This can be done outside or inside the wall.
- Note that the player will not always leap out into a safe spot (the player may actually leap into the wall, resulting in unnecessary damage)
- Crystal:
- Falling Crystals: Olm lets out a cry, targeting one player with a red aura. The targeted player will proceed to have 11 spiked crystals fall on top of them, dealing 16-20 damage to any player if caught underneath one. These crystals have a 1x1 AoE.
- Crystal Bombs: Olm shoots out a crystal bomb (up to three at most; two for smaller groups). The bomb explodes after being deployed for several seconds, covering a radius of four tiles. The minimum amount of damage dealt is 15. The closer you are to the bomb, the more damage is incurred, up to 60 at the centre.
The culmination of Olm's basic ranged/magic attacks, spheres and phase-specific abilities will be referred to as "standard attacks".
Throughout all non-head phases, Olm can also use the following abilities below (commonly and henceforth referred to as "special attacks"):
- Crystal Burst: Olm throws a crystal seedling under every player in the chamber. A few seconds later, the crystals burst and shove the player to a nearby tile if they are on top of them for heavy damage. The left hand will briefly show a crystal icon when using this attack.
- Lightning: Shoots out lightning running north and/or south of the chamber. Getting hit by a bolt of lightning electrocutes the player, disabling their overhead prayers, dealing moderate damage, and binding them for a few seconds. The left hand will briefly show a lightning bolt when using this attack.
- Swap: Olm will perform a teleport attack that deals damage the further the player is from the target. The left hand briefly shows a swirl when using this attack. If alone, Olm will pick a random tile anywhere in the chamber; if there are more players in the room, Olm will evenly distribute the amount of teleports. If there is an odd-numbered amount of people inside, then those people will not be subjected to the attack. Up to six players may be teleported at a time, indicated with white, green and finally orange portals (for additional pairs).
In order to clear every phase outside of the final one, both of Olm's hands must be incapacitated. During all phases but the penultimate phase, Olm's left hand will clench if it takes too much damage - 5% of the hands health within 8 ticks, specifically the eight ticks between null and special. If this occurs, the hand will become invulnerable for roughly 30 seconds. This will also prevent Olm from using special attacks for the duration. This mechanic is removed for the phase once the mage hand is incapacitated, so it is common for teams to take down the mage hand first before focusing on the melee one. Olm will also focus on one power at a time, choosing randomly from the power of acid, crystal or flame.
Olm's attack rotation is as follows:
- empty event
- standard attack
- Crystal Burst
- standard attack
- empty event
- standard attack
- Lightning
- standard attack
- empty event
- standard attack
- Teleport
- standard attack
- Loops from above
Olm's standard attacks also contain a "catch-up" mechanic. If a standard attack was skipped (for instance, due to no players being in his targeted zone), Olm will attempt to "catch up" and use a standard attack on the next attack step in addition to its action for that step. This means that Olm can use a standard attack and a special attack at the same time if the prior step's standard attack was skipped. Olm will only try to catchup an attack from one step prior; skipping multiple attack steps in the rotation will not cascade into catching up multiple standard attacks. Olm will never catchup special attacks (Crystal Burst, Lightning, Teleport, Healing hand); meaning that a well-timed skip by the player can completely prevent a special attack from occurring at all.
Safespotting

Olm's attacks are only used when a target is present in the direction that its head is facing. The head can face left, right and middle, though there are a few unique rules as to how the head will turn, apart from the picture shown above. Olm will always attempt to face the quadrant that contains the most players; if no players are present in that quadrant, it will turn towards the quadrant with the most players and skip an attack in the process. If the right hand is damaged within 4 ticks and Olm does not scan a player, it will always turn its head to the right, and vice-versa for the left. This also includes damage inflicted by thralls, making them highly valuable in the process.
The picture provided shows the spots where Olm's head will be forced to turn, as they are outside of its visual range:
- Spots 1 and 8 will always force the head to turn left when it is facing the middle or right.
- Spots 4 and 5 will always force the head to turn right when it is facing the middle or left.
- Spots 2 and 7 will always force the head to turn middle if it is facing the right.
- Spots 3 and 6 will always force the head to turn middle if it is facing the left.
Beginning solo raiders should use the 3:0 and 4:1 method for both hands. The 3:0 method is utilized with a 4-tick weapon, such as a powered staff, hitting Olm three times without getting hit once. If using a Tumeken's shadow, there are three options players can choose from; the simple 2:0, or the more advanced 12:0 and 8:1 options. The 12:0 and 8:1 options require switching attack styles to long-range at set times in the player's attack pattern, but avoids downtime from having to run due to the shadow's slower attack speed, as the normal 3:0 method is not possible with Tumeken's shadow. Olm's positioning will also determine which of these two options can be used; if Olm appears to the west, 12:0 can be used, while Olm appearing in the east means only 8:1 can be used. This is a result of how NPC's "true-tile" is based on the southwest corner of their model.
The 4:1 method also involves a 4-tick melee weapon, such as a dragon hunter lance and allows the player to hit Olm four times while Olm only attacks once. There are many approaches to enter the 4:1 cycle.
One common method is for the player to ensure that Olm's next attack is not a special attack (Crystal Burst, Lightning, Teleport, Healing hand) and it is facing left, as Olm requires two standard attacks before using any of them. Force Olm's head to the middle, then run back and attack the left hand, which will prompt it to turn left. The player will be given around 14 or so ticks to make attacks before Olm will attack, allowing for three more hits with a four tick weapon. The 4:1 method, when used correctly, will prevent Olm from using a special attacks and the player will only face standard attacks. Other advanced methods are possible, though are also complex and should not be attempted for beginners.
If using a five-tick weapon (primarily the scythe of vitur), this will drop to a 3:1 due to the scythe's slower attack speed. Other advanced options can be used to counter the loss of ticks from running and waiting, but should not be used until the player has sufficient experience.
When forced into the next phase, Olm will retreat back underground and shake the cavern. Crystals will fall from above, with shadows indicating where they will fall. One crystal will always target a player in the room, but it can be easily avoided. The crystals have a 3x3 AoE on the tile they fall on, dealing 20-25 damage if directly under one and 12-16 if next to one when it hits the floor. After 7-8 of these targeting crystals have fallen, he will appear on the other side and start using a new power.
During the penultimate phase, Olm's head will begin to glow with a green aura. It will use all powers during this phase, and its left hand gains the ability to heal from incoming damage, indicated with an infinity symbol. This is used two attacks after the teleport attack, and will last for two of Olm's attacks before it is lifted. In this phase, both hands must be taken down at once. Once a hand is incapacitated, a bar will appear where it once was; if given the chance to fill (roughly 30 seconds), Olm will recover the use of said hand, which returns with full health, and no additional points are awarded from damaging the hand again.
In the last phase, Olm will give it its all in a final stand. Olm will retain its usage of all phase-unique abilities, but no special attacks. The Head's healing is likewise removed, allowing it to be harmed and defeated to end the encounter. During this phase, crystals will constantly fall from above, with one of these targeting a random player in the chamber. Olm also gains access to a new attack, blue pools. Olm will spit out two blue projectiles onto two random tiles, which must be stood on within 6 seconds of the attack being used or it will drain a portion of the player's current health from all unprotected players. This will deal up to 18 damage per player, and heals Olm for five times the damage dealt.
Once the head is defeated, it will collapse back into the chasm it came out of, and the exit crystal will shatter, allowing players to claim their rewards and leave the raid.
| Slot | Item (most effective → least effective) | |||
|---|---|---|---|---|
Puzzles
There are several rooms that are considered "puzzle" rooms which put more emphasis on skills rather than combat, although two of these puzzle rooms also require combat.
List of puzzle rooms:
- Jewelled Crabs
- Tightrope (Agility)
- Corrupted scavenger (Thieving)
- Ice demon (Woodcutting & Firemaking)
Crab puzzle


In this chamber are several Jewelled Crabs which cannot be killed by conventional combat. A carved sculpture nearby will continually emit glowing orbs with one present at any given time, with a new orb appearing as soon as the previous one disappears. If the player intercepts the orb, it explodes and deals damage scaled to their current health. The crabs are aggressive but have a low aggression range, attacking with fairly accurate melee; as such, use Protect from Melee to avoid unnecessary damage.
The goal is to turn the four coloured crystals in the chamber white. The crystals on the crabs can be attacked to change colour; red for melee, blue for magic, and green for ranged. The white orb emitted from the carving must be reflected off the crabs in the room to hit the crystals, which turns into the appropiate colour when it hits the crab. The crab will retain the colour for roughly five seconds. A coloured orb cannot make contact with a crab of a different colour - if this happens, the orb disappears.
Players with -63 or higher magic attack bonus will not splash on the crabs. There is also no attack delay when attacking a crab, though the player will automatically stop attacking after the first hit.
The crabs can be temporarily bound in place for ~20-30 seconds by smashing them with a hammer, a permanent item spawn of which can be found in the room. The dragon warhammer, elder maul, abyssal bludgeon work as acceptable substitutes, but must be wielded. Smashing the crabs will temporarily turn their crystals red and they'll retain aggression towards the player regardless of how far they are in the room.
All layouts require the use of three crabs to clear the room. The more players in a raid, the more crabs will be present in the room; these should be lured away if next to a coloured crystal to avoid having them walk into and redirect an orb.
| Crystal | Orb Colour | Style |
|---|---|---|
| Black | White | None |
| Yellow | Blue | Mage |
| Cyan (Blue) | Red | Melee |
| Magenta (Purple) | Green | Range |
Ice demon

An ice demon is blocking the way further into the cavern. It cannot be attacked immediately due to the cold protecting it and must be warmed up to force it out of its spot. There are four braziers surrounding the demon and up to four unattackable icefiends (one for each player) that will try to extinguish any flames set by the team. The icefiends do not move from their spot, so they can only focus on the brazier in front of it.
The room will contain a permanent item spawn of a tinderbox and bronze axe.
Multiple saplings are nearby which can be cut for kindlings. The saplings in this room are usually more durable and will often yield nearly full or full inventories before being felled, with higher Woodcutting levels providing more kindling on average for each successful chop. In a solo encounter, 54 kindling is enough to force the demon out. Kindling is a stackable item, capped at 28 per stack and thus only three inventory spaces are needed; one for the axe, another for the tinderbox and the last for kindling. In larger teams, additional kindling is required to account for the icefiends' attacks with minor coordination which usually consists of lighting the fires on the same or near tick.
Once thawed, the icefiends die and the demon moves out of its spot, becoming attackable. It uses AoE attacks; a snowball and Ice Burst. If Protect from Magic is used, it will only focus on Ice Burst, while if Protect from Missiles is used, it will simply throw snowballs instead. Both attacks have a 3x3 AoE and can deal high damage if struck. It is recommended to keep Protect from Missiles active to only ensure the snowball attack. While it's possible to dodge both attacks, the Ice Burst projectile travels significantly faster than the snowball, which can also freeze the player.
The ice demon has very high Defence with high defence values, although it is susceptible to stab, slash and magic. It will reduce the damage from all attacks except fire spells by 67%, the latter also able to deal 150% more damage. This makes fire spells the most effective, as the demon's magic defence is rolled off its Defence level, not Magic. However, doing so will lock the player from the more useful thralls, so it is more common to kill the demon with ranged despite its higher ranged defence. If Tekton or Vasa Nistirio is not up ahead (or at least very far off), it is recommended to dump both specials from the Elder maul or Bandos godsword to make the demon easier to hit; if either one is coming soon, only use one special regardless if it hits or not.
Upon clearing the room, players will be awarded with a batch of endarkened juice, stinkhorn mushrooms and cicely.
Thieving


A corrupted scavenger blocks the path and must be fed cavern grubs until it becomes full and tired. Cavern grubs can be found by opening many of the chests located in the room. The scavenger's hunger level can be tracked with the bar above its head.
The player will usually get one grub, although it's possible to get more, which scales on the player's Thieving level.[2] Chests will always guarantee grubs upon being opened. These chests automatically lock themselves shortly after being opened. While a chest can be opened with bare hands, having a lockpick or hair clip significantly reduces opening time. There are no lockpicks provided in the room, so either open the chests by hand, or kill scavengers for a lockpick.
One of these chests always contains a one-time loot of psykk bats; one bat per person in the raid when the chest is opened, with a minimum of 5 and a maximum of 25.[3] Three chests contain poison which is released when opened, dealing 1-3 damage to anyone next to the chest. This does not inflict poison on the player (nor will poison immunity prevent it). The poison chests will automatically lock themselves so take note of which ones have poison to avoid opening them.
Some layouts will contain one or two circular formations of four chests which can all be opened one after the other without needing to run. These spots are most ideal for players needing to regenerate run energy. If this formation isn't there (or they have a poison/bat chest), simply open other chests on walking speed.
It is recommended to deposit grub into the trough upon reaching ~10-15 grubs, as this speeds up the raid slightly as to not wait for the scavenger to finish eating.
Upon clearing the room, players will be awarded with a batch of endarkened juice, stinkhorn mushrooms and cicely.
Tightrope
A group of deathly rangers and mages stand on a platform with a tightrope running in between. On the other side of the rope is a keystone crystal that must be grabbed to dispel the shimmering barrier leading deeper into the caves. The enemies can hit through prayer, but their damage and accuracy is reduced. Crossing the rope requires Agility; the level requirement is between 80% and 100% of the average agility level of the team, scaled randomly.[4]
While they are tolerant to players, if any player attempts to cross the tightrope while they are not engaged in combat, they will immediately focus on them to protect the crystal. The player will take all damage in one tick after crossing the rope, which will usually result in massive damage or instant death. However, it is still possible to bypass the hits with proper timing and is frequently used by experienced players to avoid having to kill the enemies despite giving slightly less points, which is primarily done for the sake of speed clearing.
If killing the enemies off, the mages should be dealt with first, due to their lower max hit. When dealing with rangers in a group, one player should aggro the selected target before hiding behind an obstacle. This prevents the ranger from attacking as much. The "tank" should take a hit every three to four blowpipe hits to ensure that the ranger does not change aggro to an attacker. In a solo encounter, a weapon with a range of 10 can be used to "safespot" the enemies by hitting them once and then running out of visual range (not being able to see the NPC); this will cause them to lose aggression. While slower, this saves more food supplies due to the extremely accurate attacks of the enemies, and the rangers hit significantly harder than the mages.
When the keystone is used on the barrier, any surviving enemies will be automatically killed.
-
 The tightrope must be crossed to obtain the keystone.
 -
 One of the randomly generated tightrope rooms.
 -
 "Safespots" against the enemies in the room. "1" is the tile that safespots the rangers, while "2" safespots the mages. These spots work in all variations of this layout.
 -
 "Safespots" against the enemies in the room. "1" is the tile that safespots the mages, while "2" safespots the rangers. These spots work in all variations of this layout.


_safespot.png)
_safespot.png)
Resources
The Chambers of Xeric have various resources which can be used in the raid to make things easier. There are two types of rooms, one each with Fishing or Hunter with three different variants. One of each of Hunter and Fishing will be present in each raid. Regardless of which type is generated, each resource room has at least one Gourd tree, a geyser, one farming patch consisting of two herb patches, nearby tools that contain a rake, spade and seed dibber, a chest storage and two saplings. Fishing rooms have three fishing spots, although one is infested with a cave snake that will damage players and potentially steal fish if the player doesn't get out of the way in time.
The gourd tree can be picked indefinitely for Empty gourd vials, which serve as the chamber's variant of vials and are used for making potions. They can be filled by using them on the geyser.
Seeds can be obtained from the demi-boss rooms (guardians, mystics, shamans) or by raking the weeds at the end of the first and second floor or start of the second floor.
The other materials required can be obtained from killing scavenger beasts.
Food
All these cooking resources require the same level for hunting or fishing them. They are not often utilised in normal raids due to Xeric's aid providing more healing per inventory space.
Fishing
To catch fish, a fishing rod is required, with cave worms as bait. In fishing rooms, there are three fishing spots. One of these three spots contains a cave snake, which will damage the player (or take their fish). If a snake appears in the fishing spot, stop fishing and click elsewhere to avoid taking damage. The spots will periodically change. Both of the items needed can be obtained from killing scavengers.
| Food | Levels | XP | Heals | |
|---|---|---|---|---|
| Pysk fish (0) |
|
|
5 | |
| Suphi fish (1) |
|
|
8 | |
| Leckish fish (2) |
|
|
11 | |
| Brawk fish (3) |
|
|
14 | |
| Mycil fish (4) |
|
|
17 | |
| Roqed fish (5) |
|
|
20 | |
| Kyren fish (6) |
|
|
23 | |
Hunter
In resource rooms without fishing spots, there will be two to three bats flying around in the chamber, which can be caught and cooked for food. Players with 99 Hunter can catch any bats barehanded; otherwise, a butterfly net is required, which can be obtained from scavengers.
| Food | Levels | XP | Heals | |
|---|---|---|---|---|
| Guanic bat (0) |
|
|
5 | |
| Prael bat (1) |
|
|
8 | |
| Giral bat (2) |
|
|
11 | |
| Phluxia bat (3) |
|
|
14 | |
| Kryket bat (4) |
|
|
17 | |
| Murng bat (5) |
|
|
20 | |
| Psykk bat (6) |
|
|
23 | |
Farming
Seeds can be obtained from several bosses, such as the Skeletal mystics, Lizardmen shamans, and Guardian statues. They can also be found by raking weeds in the top and lower floors (the last area in those floors and the first area in the lower floor).
There are two farming plots in each resource room for players to grow herbs. Due to the magic of the chambers, herbs grow faster and are fully grown in 30 seconds.
| Seed | Level | Planting XP | Harvest XP | |
|---|---|---|---|---|
| File:Golpar seed.png | Golpar seed | 4 | 10 | |
| File:Buchu seed.png | Buchu seed | 6 | 15 | |
| File:Noxifer seed.png | Noxifer seed | 12 | 30 | |
Herblore
Potions can be dropped in small amounts by the bosses, though this should not be relied on to obtain them. Scavenger beasts drop Herblore secondaries.
There are three types of potions a player can make:
- Golpar (combat potions)
- Buchu (recovery potions)
- Noxifer (overload-type potions)
To create potions in the chambers, a gourd must be collected from the nearby gourd tree, then filled with water from the nearby water spout, or with Humidify. Gourds can be picked en masse with the "Pick-lots" option. Gourds automatically break upon drinking the last dose of the potion.
Note: Overload tier is capped based on your Herblore level and potions being used. For example, you cannot make Overload(+) without having 90 Herblore and Elder(+), Twisted(+), and Kodai(+) potions. If you have those potions but only have 75 Herblore, the combat(+) potions will downgrade one tier to create a normal Overload.
Weak potions
| Potion | Level | Herb | Second ingredient | XP | Effect | |
|---|---|---|---|---|---|---|
| File:Elder (-).png | Elder (-) | 6.5 | Increases Attack, Strength, and Defence levels. | |||
| File:Twisted (-).png | Twisted (-) | 6.5 | Increases your Ranged level. | |||
| File:Kodai (-).png | Kodai (-) | 6.5 | Increases your Magic level. | |||
| File:Revitalisation (-).png | Revitalisation (-) | 13.5 | Restores your stats and Prayer. | |||
| File:Prayer enhance (-).png | Prayer enhance (-) | 13.5 | Regenerates prayer points over time. | |||
| File:Xeric's aid (-).png | Xeric's aid (-) | 13.5 | Works as Saradomin brew. | |||
| File:Antipoison (-).png | Antipoison (-) | 13.5 | Cures poison and provides immunity to it for 90 seconds. | |||
| File:Overload (-).png | Overload (-) | File:Elder potion (4).pngElder (-) File:Twisted potion (4).pngTwisted (-) File:Kodai potion (4).pngKodai (-) |
33.5 | Boosts all the player's combat stats by 4 + 10%, while damaging them for 50 hitpoints. This boost is reapplied every 15 seconds for 5 minutes until the effects wear off, and the player is then healed 50 hitpoints. | ||
Standard potions
Standard potions have the effects of their super variants outside (e.g. the Overload is exactly the same as the one in Nightmare Zone).
| Potion | Level | Herb | Second ingredient | XP | Effect | |
|---|---|---|---|---|---|---|
| File:Elder potion.png | Elder potion | 10 | Increases Attack, Strength, and Defence levels. | |||
| File:Twisted potion.png | Twisted potion | 10 | Increases your Ranged level. | |||
| File:Kodai potion.png | Kodai potion | 10 | Increases your Magic level. | |||
| File:Revitalisation potion (4).png | Revitalisation potion | 20 | Restores your stats and Prayer. | |||
| File:Prayer enhance (4).png | Prayer enhance | 20 | Regenerates prayer points over time. | |||
| File:Xeric's aid (4).png | Xeric's aid | 20 | Works as Saradomin brew. | |||
| File:Antipoison potion.png | Antipoison potion | 20 | Cures poison and provides immunity to it for six minutes. | |||
| File:Overload (4) (Chambers of Xeric).png | Overload | File:Elder potion (4).pngElder potion File:Twisted potion (4).pngTwisted potion File:Kodai potion (4).pngKodai potion |
50 | Boosts all the player's combat stats by 5 + 13%, while damaging them for 50 hitpoints. This boost is reapplied every 15 seconds for 5 minutes until the effects wear off, and the player is then healed 50 hitpoints. | ||
Strong potions
| Potion | Level | Herb | Second ingredient | XP | Effect | |
|---|---|---|---|---|---|---|
| File:Elder potion (4).png | Elder (+) | 13 | Increases Attack, Strength, and Defence levels. | |||
| File:Twisted potion (4).png | Twisted (+) | 13 | Increases your Ranged level. | |||
| File:Kodai potion (4).png | Kodai (+) | 13 | Increases your Magic level. | |||
| File:Revitalisation potion (4).png | Revitalisation (+) | 26.5 | Restores your stats and Prayer. | |||
| File:Prayer enhance (4).png | Prayer enhance (+) | 26.5 | Regenerates prayer points over time. | |||
| File:Xeric's aid (4).png | Xeric's aid (+) | 26.5 | Works as Saradomin brew. | |||
| File:Antipoison (+).png | Antipoison (+) | 26.5 | Cures poison and provides immunity to it for nine minutes. | |||
| File:Overload (4) (Chambers of Xeric).png | Overload (+) | File:Elder potion (4).pngElder (+) File:Twisted potion (4).pngTwisted (+) File:Kodai potion (4).pngKodai (+) |
66.5 | Boosts all the player's combat stats by 6 + 16%, while damaging them for 50 hitpoints. This boost is reapplied every 15 seconds for 5 minutes until the effects wear off, and the player is then healed 50 hitpoints. | ||
Storage Units

Storage units are built from mallignum root planks, obtained as drops from scavengers. A hammer is required in building storage units, with the dragon warhammer being a suitable substitute.
By default, tiny storage units are already provided where they will store 25 of the player's personal items. Outside items such as saradomin brews will stack if they are all of the same item, but raid items (e.g overloads) will not regardless if they are the same or not. The shared inventory allows players to store items used in the raid, such as the tools, seeds, herbs, Herblore secondaries, and potions. The personal inventory is much like the shared inventory, but it can also hold the player's belongings, such as weapons and armour. The player can also put in raid-unique items in there if desired. In addition to this, once a storage unit is built anywhere in the Chambers, they will appear in all potential hotspots where they may be found.
Storage units can be found at the end of each floor, in addition to appearing in resource rooms, the corrupted scavenger, and ice demon chambers.
While higher levelled storage units can be built immediately, they still require the materials to build the previous tiers. So in order to build a large storage unit instantly, you need 6 planks (4 for the first two storage units, then 2 for the remaining upgrade).
| Storage units | Planks required | Experience | Capacity | Capacity (personal) | ||
|---|---|---|---|---|---|---|
| Small storage unit | 30 | 2 | 150 | 250 | 30 | |
| Medium storage unit | 60 | 4 | 150 | 500 | 60 | |
| Large storage unit | 90 | 6 | 150 | 1,000 | 90 | |
| Massive storage unit | 99 | 8 | 150 | 1,500 | 120 | |
References
| Mount Quidamortem | |||||||||||||||||||||||||
|---|---|---|---|---|---|---|---|---|---|---|---|---|---|---|---|---|---|---|---|---|---|---|---|---|---|
| NPCs (inside) |
| ||||||||||||||||||||||||
| Scenery |
| ||||||||||||||||||||||||
| Items |
| ||||||||||||||||||||||||
| Rewards |
| ||||||||||||||||||||||||
.png)
.png)
.png)
.png)
.png)
.png)
.png)
.png)
.png)
.png)
.png)
.png)
.png)
.png)
.png)
.png)
.png)
.png)
.png)
.png)
.png)
.png)
_(Chambers_of_Xeric).png)
.png)
.png)
.png)
.png)
.png)
.png)
.png)
.png)
.png)